logo

logo

Tuesday, August 7, 2012

Pina Colada Tilapia


Hi guys!  I made THE best tilapia last night.  Best. Ever.  I know you are thinking…..what was Courtney doing eating tilapia and not chicken fried steak, or pure lard or something?  Yes kids, sometimes I keep it light;)  And it was super necessary last night because all of these fruit crisps, and cheesecake bars are catching up with me.  So last night I cooked fish.  But my husband and kids ate chicken.  Losers.

A couple of months ago, I showed you a recipe for Chicken in a Tequila Cream Sauce.  This recipe is called Pina Colada Fish (or Chicken).  And similarities to the Chicken in a Tequila Cream Sauce end after the use of booze.  One used tequila and one uses rum, but this dish I am about to show you is light and healthy and the other one wasn’t.  I can’t sugar coat it.  It just wasn’t.

This recipe features tilapia (or chicken) that is quickly sautéed and then coated in a light sauce of rum and light coconut milk.  It is then topped with a pineapple salsa and toasted coconut…..and it is crazy good.  I served mine over rice, and it rocked.  I will show you how I made it.


Let’s start with the pineapple salsa.  This recipe will give you more salsa then you need, but you will thank me.  You will be glad you have extra, just make sure you have tortilla chips on hand.

I used crushed pineapple, cilantro, lime, a jalapeno, red onion, bell pepper and salt.

I chose crushed pineapple because it was one less thing I would have to cut.  I KNOW……I know that my onions and bell peppers are already chopped.  I hate to cut/chop.

I drained my pineapple really well.  I pushed it against the sieve with my hand…..I drained off all the juice that I could.


I used one half of a jalapeno.  I removed all of the ribs and seeds, as this is where the heat lives.  You can adjust your hotness level as you wish.


In a bowl, I mixed up my pineapple, diced onion, diced bell pepper, cilantro, jalapeno and salt.  Then, I squeezed the juice of a lime over the top and mixed again. 


This right here could be the whole recipe and I would be happy.  It is sweet, spicy and all together crazy good.  I popped this in the fridge while I finished the rest of the dish.


As for the coconut, I spread it out on a baking sheet and baked it at 400 degrees for about 5 minutes.  This will be the topped for my fish (or chicken).  Can we just agree that every time I say fish I am talking about the chicken too?

Thanks.


Toasted.


I used about 6 ounces of fish and about a pound of thin sliced chicken breasts.  If you can’t find thin sliced chicken breast, pound out your chicken so it is thin.  Otherwise, it will have to cook forever in your pan,

I also used oil, butter, rum and light coconut milk.

Light coconut milk is pretty readily available in your grocery store’s Asian section.  It has ½ the fat and calories of regular coconut milk.  Hence the “light” in its name.


I seasoned the fish with salt and white pepper.  White pepper isn’t a necessity, it is just what I grabbed first.

Season on both sides.


Next, I sautéed the fish in a combination of butter and oil.  The butter is for flavor, but the oil has a higher smoke point and won’t burn.


Once the fish was done, I removed it from the pan and poured my rum straight into the fishy pan.  I stirred this around and let it reduce.  Be careful if you have a gas stove…..pour in the booze off the heat…..if you like your eyebrows.

Make sure scrape the pan to get up all the good chicken and fish bits.  I know that sounds gross, but it really is good flavor.


Finally, I stirred in the coconut milk.  I let this reduce a bit too.

Now everything is ready….it just needs to be assembled.

I started with rice, then fish, then sauce, then salsa and finally, toasted coconut.

Like so:


Are you kidding me?  This has all the flavors of a pina colada and a helluva lot more.  The salsa is fresh and light, and the sauce tastes rich and creamy.  Again, so crazy good.


Look at all the pretty colors!


I felt like I was on a tropical vacation.  Except my kids where there and that isn’t a relaxing vacation.

They ate this with chicken like I said above, but I really recommend you make this with tilapia.  Fish loves tropical flavors and tilapia is no exception.

You have to try this.

Pina Colada Tilapia

1 pound tilapia

1 tablespoon butter

1 tablespoon oil

½ teaspoon pepper

½ teaspoon salt

1/3 cup rum

1/3 cup light coconut milk

½ cup shredded sweetened coconut

Salsa:

20 ounce can crushed pineapple, well drained

½ cup red onion, chopped

½ cup bell pepper, chopped

3 tablespoons cilantro, chopped

½ a jalapeno, chopped-seeds and ribs removed

Juice of one lime

¼ teaspoon salt


To prepare salsa, place all ingredients in a large bowl and mix gently.  Refrigerate until ready to use.

Preheat oven to 400 degrees.  Bake coconut on a baking sheet for 5 minutes or until golden brown.  Set aside to cool.

Season fish with salt and pepper.  Melt butter in oil in a sauté pan.  Sauté fish over medium high heat for about 2 to 3 minutes per side, or until cooked through.  Remove from pan.

Add rum to pan.  Boil for about a minute scraping the bottom of the pan as it cooks.  Add coconut milk and simmer for another minute.  Sauce will reduce and thicken.

Top fish with sauce, salsa and toasted coconut.

Serves 4

Friday, August 3, 2012

Peachy Cream Cheese Bars


National Cheesecake Day was July 30th.  I tend to miss things by a few days.  That’s not unusual.  I’m going to go ahead and pretend that it is National Cheesecake Week and that I didn’t miss a thing.  I think cheesecake deserves a whole week, don’t you?

Today I am going to show you a recipe that actually isn’t mine.  It’s my mom’s.  Plus, it isn’t actually cheesecake at all…..I think the true name is “cream cheese bars”.  Hearing about National Cheesecake Day, of course got me craving cheesecake.  But I didn’t want to make a cheesecake.  Too much work.  I remembered my mom’s cream cheese bars, and I thought….good enough!  They have all the elements…..a crust and a cream cheesy layer, but they are a lot easier to make.  I made the crust in the food processor and the filling takes less than a minute to whip up.  Plus, they are in bar form so that’s always easier.  And, I jazzed mine up with Gourmet Rooster County Fair Peach Spread.  Win/win.

If you are craving cheesecake, but don’t want to put in the time….and if you are feeding a crowd (this recipe is easily doubled), you will want to make this.


For the crust, I used Bisquick, butter, brown sugar and slivered almonds.  This is basically a shortbread crust.  Yummy, buttery, crumbly shortbread……..


I threw everything into the food processor.  And yes, my butter was room temperature.

If you don’t have a food processor, you can use a hand mixer.  Or a pastry cutter thingy if you are takin’ it old school.


It will come together into a crumbly dough.


I reserved ½ cup for the top…..


And the rest got pressed into an 8x8 baking pan that I had sprayed with cooking spray.  This has plenty of butter, and most likely won’t stick, but nothing pisses me off more than stuck crusts.

This baked at 350 degrees for 12 minutes.

While the crust was baking, I made the filling.


The filling is Gourmet Rooster County Fair Peach Spread, cream cheese, an egg, sugar, milk, vanilla extract and lemon juice.

Look at how fancy I am shopping at Whole Foods;)  Totally not the norm for me…..You know I’m a Wal-Mart girl.


I put the cream cheese, milk, egg, sugar, vanilla and lemon juice into a mixing bowl.

The peach spread comes later….and if you were wondering, yes…you can use any fruit spread or preserve that you like. 


I blended this until it was smooth and creamy.  The cream cheese needs to be at room temperature so this happens pretty quickly.


Time for the peach spread!  I poured about ¾ of the jar on to my baked crust.  I spread this out with a spatula.


Next, I poured on the cream cheese filling and spread that around too.


Finally, I topped the whole thing with the reserved crust crumbs. 

This baked at 350 degrees for about 25 to 30 minutes, or until the middle was set.

The whole thing goes in the fridge to chill for a couple of hours…..if you can wait that long;)


These little babies are like the perfect little taste of cheesecake.  I felt better about myself because I just ate one bar and not a big ‘ol slice of cheesecake.


Look at the crunchy top!


And look at the creamy filling and the yummy peach spread!  These are so delicious, and I really feel they are easier to make then a full on cheesecake.  Plus, cheesecake is so rich and decadent…this is like a creamy, light little bite.  And the peach spread makes this fresh and summery.

I think this recipe is a must try.  And yes, I totally claim it as mine now….sorry mama!!;)

Peachy Cream Cheese Bars

½ cup brown sugar

¼ cup butter (1/2 a stick)-room temperature

1 cup Bisquick

½ cup slivered almonds

8 ounces cream cheese-room temperature

¾ cup Gourmet Rooster County Fair Peach Spread

¼ cup sugar

1 Tablespoon lemon juice

2 teaspoons milk

1 teaspoon vanilla extract

1 egg

Preheat oven to 350 degrees.  Spray an 8x8 baking pan with cooking spray.

In a food processor, blend together brown sugar, Bisquick, butter and almonds until mixture comes together.  Reserve ½ cup of dough for later.  Press remaining dough into greased baking pan.

Bake crust at 350 degrees for 12 minutes.

Pour peach spread over baked crust and spread evenly.

In a large bowl, blend together cream cheese, egg, milk, vanilla and lemon juice with a hand mixer.  Blend until smooth.

Pour filling over peach spread.  Spread evenly.  Top with reserved dough.  Sprinkle evenly.

Bake at 350 degrees for about 25 to 30 minutes or until middle is set.

Chill for 2 hours before serving.

Serves 8


Tuesday, July 31, 2012

Farmer's Market Secrets and a Fruit Crisp


Are you all going to Farmer’s Markets this summer?  Obviously, I have been.  I have learned a couple of secrets at the Farmer’s Markets I have been going to.  I can’t promise that all markets are the same….but let me tell you what I have learned.  I don’t want to give away all of the Farmer’s secrets, but I have to share this. 

First off, if they tell you that something is ripe….eat it right then and there.  Or later that day.  It won’t last till tomorrow.  Ripe means almost done.  Buy your produce slightly under ripe and let it ripen at home. 

Second, sometimes the produce will look a little icky and wilty.  It is just because it has been sitting in the sun, and it maybe has gone for a long truck ride to get there.  Especially if you are in Nevada.  Our produce isn’t grown in Reno.  It has had a long car ride.  How do you feel after a long car ride in the summer?  Probably a bit wilty and gross.  Just put your produce in the fridge or in ice cold water and it should perk back up.  Don’t get discouraged and think the produce has gone bad….it hasn’t.  And for cryin’ out loud, don’t say bad things about the produce to the farmer.  He or she worked hard to grow that.  Don’t hate.

Lastly, and this is the best secret…..if you don’t have something specific in mind, and you are willing to buy what is there…..shop the last 30 minutes of the market.  Most of the farmers will have marked their produce down so they don’t have to take it back home with them.  I have gotten some smoking deals by just trolling around at the end.  Some even give stuff away right at closing.  Seriously.

Are you wondering what to do with all that fruit you have brought home?  I am going to show you a kick ass fruit crisp recipe.  It is crazy easy and tastes amazing.  You all know what a fruit crisp is, right?  It is delicious fruit baked with a crispy sweet topping.  And….you can use virtually any fruit.  Ok, you can’t use melons or citrus, but pretty much any stone fruit, berry, apple or pear will work.  Let me show you how I make it.


I started with about a pound of fruit.  I used blueberries and super ripe nectarines.  Did I mention that you can mix fruits?  And that you totally should?

My nectarines were so ripe that the skin slipped right off.  If you are using fruit that needs its skin removed, like a peach….do it.  Peel your stone fruits by scoring the top and dropping them into simmering water for about 30 seconds.  The skin will come right off.  If you are using an apple or pear, use a paring knife.


I put my fruit into the bottom of a pie pan.  I sprayed my pan with cooking spray first.  You could do that, or use butter.

Isn’t my fruit pretty?


Let me warn you….I think the best thing about a fruit crisp is the crunchy topping.  I make a thick, buttery sweet topping.  Every bite gets a big ‘ol piece of topping.

I used flour, oats (quick), brown sugar, cold butter, pumpkin pie spice and chopped nuts.  I had some mixed nuts in my cupboard that I threw in the food processor.  That is the best thing about this crisp….I bet you have all that you need to make the topping in your pantry already.


I put all the ingredients in the food processor.  My ice cold butter has been cut into small pieces to help the processor along.


I pulsed this until I had pea sized chunks.  Look very closely and you will see that there are clumps of butter and other stuff that is now pea sized.


I covered my fruit with the topping, making sure that not a speck of fruit was showing.  Remember….I really like this topping.  If you are more of a fruit gal, you can feel free to NOT use all the topping.  But that would be weird, in my book.

I baked this at 400 degrees for about 25 minutes.


At the end of 25 minutes, I had this thing of beauty.  The fruit still manages to creep up no matter how much topping you put on!

I let this cool a bit before serving.  One of the great things about this recipe is that it is still crazy good room temperature.  It doesn’t have to be served smokin’ hot.


I served mine with whipped cream, but ice cream would be amazing on this.  That is what I normally would do, but this is Paisley’s and she asked for “whiff cream”.


Look at the beautiful nectarines and blueberries!  They are at the peak of their season right now so they didn’t need any additional sweetening.

Remember, fruit freezes well!  Buy a ton from a farmer and freeze it in pie pans!  Then, all it needs is the crunchy topping which takes like 5 minutes to throw together.  How awesome would it be to have this great dessert always on hand?


Yum!  Look at the crunch on that!!  Man, I really love butter.  And brown sugar.  And this.

I hope you try this recipe!  And please don’t tell the farmer’s I’m spilling secrets.

Fruit Crisp

1 pound fruit, such as berries, stone fruit or apples/pears

                -peeled and sliced if necessary

½ cup flour

1 cup quick oats

¾ cup brown sugar

2 teaspoons pumpkin pie spice

½ teaspoon salt

½ cup, (one stick) cold butter, cut in cubes

½ cup chopped nuts (optional)

Preheat oven to 400 degrees.

Place fruit in a pie pan that has been sprayed with cooking spray.

Place remaining ingredients in food processor.  Pulse until mixture is in pea sized clumps.

Cover fruit completely with topping.  Bake at 400 degrees for about 25 minutes or until top is browned and bubbly.

Serves 6-8

Friday, July 27, 2012

Happy Olympics!

In honor of the Summer Olympic Opening Ceremonies, on TV tonight, I am reposting a recipe that I did last year.  It's Fish and Chips!  Jolly Good.  As you must know, and I really hope you do know, the Olympics are in London this time, so fish and chips seemed fitting.
Enjoy, and I promise I will be back next week with all new recipes.
http://gourmetrooster.blogspot.com/2011/04/god-save-queen.html

Tuesday, July 24, 2012

Roasted Red Pepper and Garlic Stuffed Mushrooms

Hi everyone!  I'm so excited because cheerleading starts again for the season today!  Not for me, although that would be rad.  But for Addy.  I wish I was a cheerleader, even at my advanced age, but my high school friends would tell you that I am way to spastic to ever cheer. 
Anyhoo, I love cheer because I love watching her do something she loves, I love the coaches and other moms, and I just love the whole spirit of small town (kinda) football.  So before I take Addy to day one of cheer camp, let me give you a quick recipe.
People are always asking me what to do with my Gourmet Rooster savory spreads.  Seriously, every Farmer's Market, I get at least 5 people asking me what to do with them.  The savory spreads are great on sandwiches, with cheese & crackers, with meats, etc.  You just have to use your imagination.  What would you want to put onions on or in?  Or roasted red peppers?  Just sub in one of my spreads and you have the perfect flavor!  They are super easy to use....they are already cooked and seasoned to perfection.
Today I am going to show you a really easy recipe featuring my Roasted Red Pepper and Garlic Spread.  I have shown you a recipe for stuffed mushrooms before....
http://gourmetrooster.blogspot.com/2011/11/thanksgiving-countdown-starts-now-today.html
Today's recipe is a twist on that recipe.  I still use ground sausage and I still use a creamy cheese, but I am using Roasted Red Pepper and Garlic Spread which will give these stuffed mushrooms an really different, but amazing flavor.
These will be your go-to appetizer.  I swear.
For this recipe (the stuffing), I used sage flavored bulk sausage, Philadelphia Cooking Creme (plain flavored), Roasted Red Pepper and Garlic Spread, Parmesan cheese and chives.
This recipe is super easy....it even has very few ingredients.  Perfect for a quick app.
I also used plain white button mushrooms.  I bought mine out of the bulk bin because I wanted big ones.  The pretty, already cleaned ones aren't big enough.  I wish they were because I hate cleaning mushrooms.
But here I am cleaning my mushrooms.....
I used a clean, damp towel.  Don't run them under the faucet....this will make them tough.
I also pulled the stem out of each mushroom.  This will give you the perfect well to fill with stuffing.
I threw my stems away.  They really aren't good for anything.
I started my filling by browning up the sausage.  This goes fast.  You've done this before, right?
Next, I added my cream cheese.  You can use regular cream cheese or cooking creme.  They taste the same.
I let this melt into the hot sausage.
Then, I added the Roasted Red Pepper spread.  At this point, the mixture will seem kind of soupy.  I let mine simmer for a few minutes to thicken up a bit.
Plus, I accidentally ate about half of the filling at this point.  It is that good.
I stuffed each mushroom with filling.  FYI-I had placed my mushrooms in a baking dish that I had lightly sprayed with cooking spray.
I also topped each shroom with Parmesan cheese.  I love the way this makes a crust when baked.  The parm is a must.
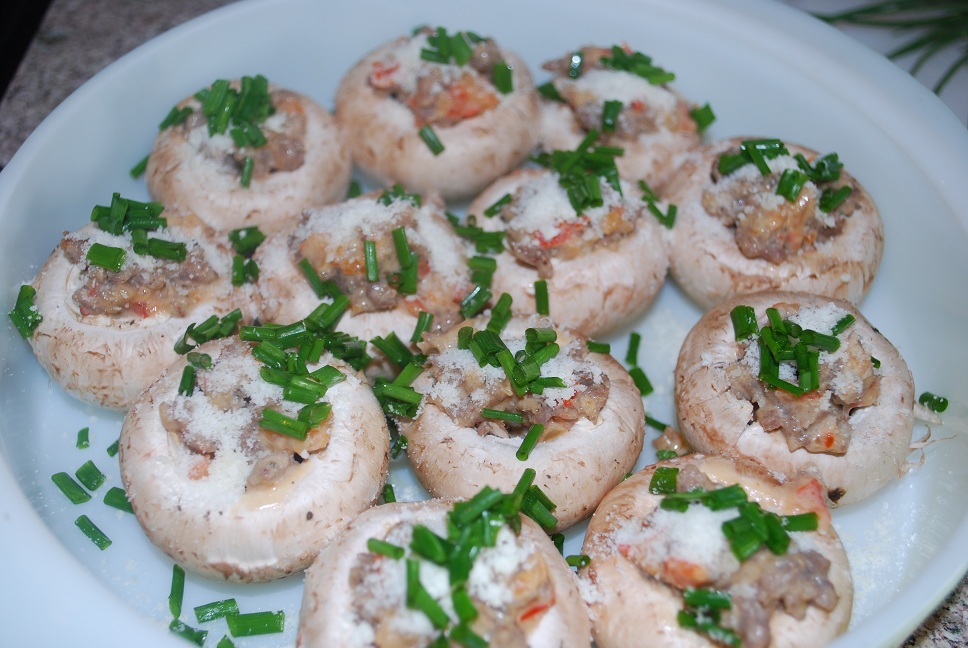
Finally, I sprinkled chives on the top of each mushroom.  Now this part is totally up to you.  I like to add my chives before baking because I like the way they get crispy in the oven.  You can do that, or you can add them as soon as you take the shrooms out of the oven.  The chives will add a fresh oniony taste if you add them after baking.  Your choice.
I baked these at 400 degrees for about 20 minutes.
Delicious!  And such a fun and cute little appetizer!  The sausage is yummy, the spread is sweet and the cheese is creamy.  And the Parmesan cheese and chives are magic on the tops.
These are the perfect little cocktail party appetizer.  Or dinner if you eat a plate of 10.  Like I did.
You know you want this.

I will see you on Thursday!  Off to cheer....maybe they will let me learn the routine;)

Roasted Red Pepper and Garlic Stuffed Mushrooms
24 whole white button mushrooms
½ pound pork sausage
4 ounces cream cheese
½ cup Gourmet Rooster Roasted Red Pepper and Garlic Spread
1/2 teaspoon salt
1/4 cup Parmesan cheese
2 tablespoons chives, chopped
Preheat oven to 400 degrees.

Prep mushrooms by wiping them with a damp cloth. Pull out stems and discard. With a paring knife or spoon, make each hole a little bit bigger.

In a large skillet, brown sausage over medium high heat. Once sausage is browned, about 5 minutes, add cream cheese, salt and red pepper spread. Mix well and simmer over medium heat for about 3 minutes.

Fill each mushroom cap with sausage mixture, about 1 teaspoon each. Top each cap with Parmesan cheese and chives.

Bake at 400 degrees for 17 to 20 minutes or until tops are slightly brown and bubbly.

Makes 24.


Thursday, July 19, 2012

Bacon Wrapped Asparagus!


Good morning!  It’s a Farmer’s Market day….so let’s jump right in.  I’ve got stuff to do;)

Today I am going to show you how to make a favorite of mine.  You all know that veggies aren’t my thing…..but I love them when they are wrapped in bacon;)  I’d love just about anything if it is wrapped in bacon.  Especially asparagus.

A little back story here….My mom took me to Disneyland when I was 19.  Yes, I had been before, but this trip was really memorable.  Mainly because I had bacon wrapped grilled asparagus.  On a stick.  I think it was in a little booth across from the Jungle Cruise.  I didn’t know that I liked asparagus before that.  I had always stayed away from it because it is green…..and a vegetable.  But I fell in love with this.  It was smoky, salty, fresh….and again…..on a stick.  Since then, I have frequently enjoyed asparagus….especially wrapped in bacon.

Today’s little treat isn’t just bacon wrapped asparagus.  I am also going to show you how to make a Carolina Style Hollandaise sauce that is unbelievable drizzled over the tops of these guys, or served as a dipping sauce for your asparagus.   Do you know what hollandaise sauce is?  It is a thick sauce made from melted butter, lemon and egg yolks.  I jazz mine up with my smoky, sweet and tangy BBQ sauce.

This is a perfect side dish, appetizer, or even brunch dish.  You will love this.


The bacon wrapped asparagus component to this is really easy.  It really is just bacon and asparagus.

I don’t normally buy my asparagus all pretty and trimmed like in the picture above, but the asparagus sold in bunches at my store was really thin.  You need a big fat asparagus for this.  You need sturdiness to hold up to the bacon.  Plus, if you are grilling this, you don’t want it to fall through the grill.


I wrapped each piece of asparagus in ½ a slice of bacon.  You probably noticed that I have mine on a baking sheet.  Yes, I am roasting mine as opposed to grilling.  Your choice.  I didn’t feel like starting my BBQ. 

I put mine on a rack set on a baking sheet.  This way, the hot air can go all the way around the asparagus and the bottoms won’t get soggy.

I roasted mine at 400 degrees for 30 minutes.  The bacon gets crispy and the asparagus gets tender.  Perfection.

If you grill yours, grill it for about 20 minutes or until the bacon looks brown and crispy and the asparagus looks ever so slightly charred.


Done.


Salty deliciousness.

Let me show you the sauce…because that sends this over the top.  Maybe the little booth across from the Jungle Cruise (does that even exist anymore?) should offer a dippin’ sauce.


I’ve shown you this sauce before…..but here it is again.  It is so good, it deserves to be posted twice.

I used butter, lemon juice, egg yolks and Gourmet Rooster Carolina Style BBQ Sauce.

I make this in a blender, which really is the easiest way to make a hollandaise sauce.  No double boilers or anything fancy-shmancy.


That is the inside of my blender.  Isn’t it an artsy shot?;)

That is the lemon juice and egg yolks.


Then the BBQ sauce.

Then, I slowly drizzled in the melted butter through the opening at the top.  You don’t get to see that because it was a two-hand job.  I needed both hand to steady the bowl that I was pouring from.  You really do want to drizzle this in slowly, while the engine is running.  This will emulsify the sauce and make it smooth and thick. 

Hollandaise sauce doesn’t need to intimidate you.  It is super easy.


Yum!  Like I said, you can serve this as an amazing appetizer…..


Watch out for double dippers!

Or you can serve it as a side dish with the sauce drizzled over….like so:


So delicious.  You must make this.  Hurry up and do it while the asparagus is still good!

Too bad mine isn’t on a stick.  I will work on that.

Bacon Wrapped Asparagus

1 ½ lbs. fresh asparagus, washed and trimmed

1 lb. bacon, each slice cut in half

Pre-heat oven to 400 degrees.

Warp each piece of asparagus in a ½ slice of bacon.  Place on rack set on top of a baking sheet, making sure ends of bacon are tucked underneath.

Bake at 400 degree for 30 minutes, or until bacon is crispy and asparagus is tender.

Carolina Style Hollandaise Sauce

3 egg yolks

10 tablespoons butter, melted

The juice of one large lemon

¼ cup Gourmet Rooster Carolina Style BBQ Sauce

In a blender, blend the egg yolks and lemon juice.  Add in the BBQ sauce and blend.  Through the opening at the top, slowly drizzle in the melted butter while the motor is running.  The sauce should be thick and creamy.


Share