logo

logo

Tuesday, February 14, 2012

Mardi Gras Appetizers! Throw Me Some Beads!

Hi everyone!  Happy Valentine’s Day!  I hope you are all enjoying it, and I also hope you are knee deep in flowers, chocolate, etc.  Me…..you ask?  After a special Valentine’s breakfast, and helping out at Addy’s class party….I have already moved on to Mardi Gras!  A blogger must always be about a week ahead of schedule;)  And I am.  Fat Tuesday is one week from today.

I won’t give you a history lesson on Fat Tuesday.  I am pretty sure I did that last year.  Just know that I love Mardi Gras and everything associated with it.  I feel that it is something we should all celebrate….whether a southerner or not.  Mardi Gras has great food, great drinks and beautiful beaded necklaces;)  Just please, don’t lift your shirt for me.

I have my Mardi Gras/Fat Tuesday all planned out…all the way from appetizers to desserts.  Everything is easy and delicious.  I promise;)

Today I am going to show you how to make the appetizer portion of my menu.  I am going to show you how to make Spicy Fried Pickles with homemade Ranch Dressing, and Muffaletta Sliders.  Let’s start. 


Have you had fried pickles?  They are amazing.  And kind of the new thing.  Since I always need to be right on it with new things…..I no choice but to make them.

I used Bread and Butter Chips for my fried pickles because I prefer that kind of pickle to a dill pickle, but I will be honest….Dill fry better.  I have tried both, and yes, dill pickles work better.  I also used flour, salt, pepper, an egg, buttermilk and hot sauce.  The hot sauce is what makes them spicy.  You can adjust the heat to your preference.


I started by drying off my pickles.  This will help everything stick better.


In one shallow dish, I mixed together buttermilk, an egg and hot sauce.  In another shallow dish, I mixed together flour, salt and pepper.  I am going to set up an assembly line.  The pickles will start with a dip in the flour, then the buttermilk, and then back in the flour.


Like so…..

Then, the dipped pickles get deep fried.  What’s that?  You didn’t know we were deep frying these?  Yeah, I kept that to myself as to not scare you off.  But this is party food…..not everyday food.  Live a little.


I deep fried my pickles in hot oil.  The oil was about 350 degrees.  These will fry in about 3 minutes.  Once they were golden brown, I took them out of the oil and placed them on a rack to cool.  I also salted them as soon as they came out of the oil.


Yum!  Now let me show you how to make the Ranch dip…..


This is, by far, the best ranch dip I have ever had.  Homemade is the way to go, and it really is easy.  And it doesn’t even involve Hidden Valley!

I used light mayonnaise, low-fat plain Greek yogurt, garlic, lemon juice, salt, pepper, scallions, dill and parsley.  Fresh herbs are the way to go, fo’ sho’.


Everything gets tossed into the food processor.  Easiest recipe ever.  You will want to eat this on everything.  And you can!  I use low-fat mayo and low-fat Greek yogurt!  You could even use nonfat yogurt….I just don’t like nonfat.


Deep fried pickles need homemade ranch like I need daily naps.

Ok, I know you are all trying to be romantic and enjoy the rest of your Valentine’s Day so I will be quick with it and show you how to make Muffaletta Sliders…..

According to the smarty-pants at Wikipedia, a Muffaletta Sandwich is the official sandwich of New Orleans.  It is usually on a round Italian loaf of bread, and has an olive salad on it that soaks into the bread and makes it all salty and delicious.  It usually also contains salami, ham and provolone cheese.

I went a different direction with my Muffaletta.  Perhaps this is sacrilegious to those from New  Orleans, but I wanted to make mine tiny.  I wanted appetizer size sliders. Please don’t be mad if you only like ‘em big….This is just my take on it.


I chose little Hawaiian sweet rolls for my bread.  True, this isn’t as crusty and thick as Italian bread, but I toast mine to make it crustier.  Also, if the bread is a bit crusty….the olive salad won’t make the sandwich soggy.

I also used salami, ham and provolone cheese.


Are you asking yourself what the hell that is in the picture above?  That is my version of an olive salad.  I used about one cup of olive tapenade that I had in the freezer.  I used this recipe, http://gourmetrooster.blogspot.com/2012/01/tapenade-for-my-honey.html.  You can buy a jar if you don’t have any on hand.  I also threw in about ½ a cup of jarred Italian Giardiniera that I had chopped the nonsense out of.  I mixed this together and boom, olive salad.


You know what I like about the Hawaiian sweet rolls?  You can slice the whole thing horizontally really easily.  Then, once the sandwiches are ready, they easily pull apart.


I spread one half with my olive salad.


On the other half, I layered on the cheese and meats.  Then, I threw both halves into the oven and broiled them until the bread was slightly crusty.


Just like a Muffaletta but oh so cute and tiny!  I think these are perfect for a Mardi Gras party.  They scream New Orleans, but they are easy to pick up and eat while you are holding a Hurricane in your other hand.  Or while you are lifting your shirt for beads.

If you walk away with anything after reading this….I hope it is that you really want to try the homemade Ranch Dressing.  I swear, it is the most amazing ranch dressing I have ever had.  And I consider myself a bit of a Ranch dressing connoisseur.  If you want to thin it out for a salad, just use some buttermilk.

I will see you on Thursday with a Chicken Etouffee that you can make in your slow cooker, and a yummy Bananas Foster!!

Deep Fried Spicy Pickles          

2 cups pickle “chips”, patted dry

1 ½ cups flour

1 teaspoon salt

1 teaspoon pepper

1 egg

1 to 2 teaspoons hot sauce

1 cup buttermilk

Oil for deep frying

Heat oil in a large pot to 350 degrees.

Mix flour, salt and pepper together in a shallow dish.

In another shallow dish, mix together buttermilk, egg and hot sauce.

Dredge pickles in flour mix, then buttermilk, then back in flour.  Shake off excess.

Fry in hot oil for about 3 minutes, or until golden brown.  Remove from oil and place on rack to cool. 

Serves 4 to 6 people


Homemade Herby Ranch Dip

12 ounces Low-Fat Plain Greek Yogurt

1/3 cup Low-Fat Mayonnaise

½ teaspoon salt

¼ teaspoon black pepper

1 tablespoon lemon juice

1/3 cup scallions, chopped

3 tablespoons Italian parsley

3 tablespoons dill

1 clove garlic, minced

Place all ingredients in food processor and process until desired consistency is reached.

Makes about 2 cups


Muffaletta Sliders

12 Hawaiian Sweet Rolls

1 cup olive tapenade

½ cup Italian Giardiniera, finely chopped

9 slices provolone cheese

9 slices deli ham

18 slices salami

Preheat broiler.

Slice Hawaiian rolls horizontally.  Spread one half with tapenade and giardiniera that has been mixed together.  Top other half with meats and cheese.

Broil both halves for about 2 minutes, or until bread is crusty and starting to brown.  Cheese should be starting to bubble.

Place top half back on bottom half and pull sandwiches apart.  Serve warm.

Makes 12

Thursday, February 9, 2012

Valentine's Day Desserts

Hi guys!  Are you getting ready for Valentine’s Day?  We are.  Addy and Paisley have to bring Valentine’s cards to every kid in their class.  They don’t even fill out the “to”, only the “from”.  I think that really sucks the fun out of it.  You can’t get excited that a certain someone gave you a card, and totally read into it which one they gave you.  You also can’t get grossed out that someone gave you one….but I guess that is the point.  Nobody’s feelings get hurt. 

We are making “mustache” lollipops.  They will have a card attached to them that says:

I “mustache” you a question….Will you be my Valentine?”

I didn’t make that up.  That is all over the interwebz.  I am a horrible copycat;)  But the girls have had fun making them, so that is all that’s important.

Anyhoo….Today I am going to show you a really cute Valentine’s dessert, as well as a quick treat you can make to give away to friends and family.  The dessert is individual lemon and raspberry layer cakes.  I love layer cakes, but they are kind of pain to make.  These weren’t.  Plus, they are probably the cutest thing ever.  And so, so easy.  Let me show you….


The cakes were made from a boxed lemon cake mix.  Boxed cake mixes make baking so much easier, and they taste great when you dress them up with a couple extra twists.  I also used lemonade, oil, eggs and lemon zest.


I beat together the cake mix with lemonade, eggs and oil.  I used lemonade in place of the water that the box calls for.  I never use water.  That is your chance to spice the cake up any way you want! 

I also zested a lemon into this.  You can use the lemon juice instead of lemonade….but you would definitely need more than one lemon to get a full cup of juice.  It was easier to use lemonade;)


I baked these cupcakes in a muffin pan, but I didn’t use cupcake liners.  I greased each cavity really well before I put the batter in.  I filled these about 2/3 full.  I baked these according to the box directions.

When the cupcakes came out of the oven, I set them aside to cool.  Once they are cool, I will take them out of the pan.  In the meantime, let’s make the frosting.


This frosting is a raspberry cream cheese frosting.  I love raspberries and lemon together.  I think they are a great match, plus….this will be a really pretty pink frosting which is perfect for Valentine’s Day.

I used raspberry preserves, butter, cream cheese, powdered sugar, and I garnished with fresh raspberries.

If you don’t like raspberry, you could totally use strawberry preserves instead.


I started by beating together the softened cream cheese and the softened butter.  Once that was smooth, I beat in the preserves.


Then, I slowly beat in the powdered sugar.  You will need a lot of powdered sugar.  The preserves will make the frosting loose, so you need to stiffen it up with sugar.


As for the cupcakes, once they were out of the pan….I cut each in half.  I will use 3 pieces for each layer cake.  In case you can’t do the math on that….3 cupcakes will make 2 layer cakes.  If you are using a top piece for a middle piece….just cut enough off to make it flat.  Does that make sense to you?


Cutest thing ever!  And everyone gets their own!  Cutting a layer cake can be difficult, but there is no cutting with these!  I am so in love with these…I can’t even tell you!


Feel free to garnish with as many raspberries as you want!  I used a lot because I am a raspberry freak.  I always tell myself that the more fruit I eat…the better.  It will keep me from getting scurvy since I try not to eat vegetables.

My quick little treat that is prefect for giving away is……

Chocolate Dipped Marshmallows!!


These are so crazy easy.  All I did was dip marshmallows into melted candy coating and put them on sticks.  Then, I sprinkled cute Valentine sprinkles all over them before the candy coating hardened.

Like so:


I’ve told you before about my love for treats on sticks, but my complete dislike of cake pops.  These marshmallows fit the bill.  Not only are they yummy, but they are super cute.  And easy! 


I was lucky enough to find heart shaped marshmallows, but regular marshmallows are cute too.

Like this:


Cute!

Wouldn’t you love to give these away for Valentine’s Day?  Everyone will be impressed.  They won’t realize how easy it was for you to make them.


Peepers loved them!  I think your kids will too.

Have a great weekend!  I will see you all on Tuesday!

Lemon and Raspberry Layer Cakes

1 boxed lemon cake mix

Eggs and oil as directed on box

1 cup lemonade instead of water

The zest of one lemon

Frosting:

8 ounces cream cheese, softened

1 stick (or ½ cup) of butter, softened

½ cup raspberry preserves

4 cups powdered sugar

Pre-heat oven according to package directions.

In a large bowl, beat together cake mix, oil, eggs, lemonade and lemon zest with a hand mixer for 2 minutes. 

Pour batter into greased muffin pan, filling 2/3 the way full.

Bake according to package directions.  When done, set aside to cool.

When cooled, run a knife around the edges of cakes to help remove them.  Slice each cupcake in half, horizontally.

Using 3 slices of cake per layer cake, spread frosting on bottom and middle layers, then tops.  Garnish with raspberries.

Frosting:

Beat together cream cheese and butter with a hand mixer until smooth.  Beat in preserves.  Slowly beat in powdered sugar until desired consistency is reached.

Tuesday, February 7, 2012

Family Valentine's Day Dinner

Hi everyone!  How is your day so far?  It is kind of dreary here….clouds, rain, some snow, etc.  And super cold.  It’s one of those days where I can’t get warm no matter what.  But I think you are probably sick of hearing me whine.  We have had a relatively dry winter, so I really shouldn’t complain so much. But that is kind of how I roll…. I complain a lot;)  and then I wonder where my kids get it.  But I digress…..

Today I am going to show you a super cute idea for a family Valentine’s Day dinner.  If you are anything like my family, there is no way that you will get out for a hot, sexy, romantic date with your significant other.  (Hot? Sexy?...I am such a nerd).  You will be stuck at home, with the kids, all jacked up on chocolate and chalky candy hearts.  Why not celebrate as a family?  I have a great recipe for heart shaped meatloaf and what I like to call “Hugs and Kisses Veggies”.  This meatloaf is so good that you will want to make it all the time…and not just heart shaped.  It is stuffed with mushrooms, onions and cheese….it kind of reminds me of a mushroom burger.  I also serve the meatloaf on pink mashed potatoes, so the cute factor is even higher.  So let’s start this.


For my meatloaf (meatloaves?), I like to use a combo of ground beef and ground pork.  I use a pound of each.

Let your meats sit out for a bit before you make this.  There is nothing worse than sticking your hand in cold meat;) 


As for the rest of the ingredients…..I use cream of mushroom soup (condensed), bread crumbs, sliced mushrooms, smoked gouda cheese, chopped onion, garlic, Worcestershire sauce, an egg, and salt & pepper.  Meatloaf requires a bazillion ingredients, but I bet you already have a lot of them.  Unless you are my sister….then your fridge contains chocolate pudding and tequila.

I used smoked Gouda because I happen to have gotten it as a gift a few days ago.  Best gift ever too, BTW.  I heart cheese, especially smoked cheeses which you are probably figuring out from the last few weeks.  You can use regular Gouda or any smoked cheese you want.  Smoked mozzarella would rock.


I started by sweating the onions, mushrooms and garlic a bit first.  I threw them in a sauté pan with a bit of olive oil.  I just wanted to soften them up slightly.  I also salted and peppered this mix.


I like to mix everything but the meat first.  Ground meats can get tough if they are overworked.  I understand.  I am also an ass when overworked.

In the bowl above is the egg, breadcrumbs, soup, Worcestershire sauce, cheese, and sautéed veggies.  I mixed it thoroughly.


Then, I throw that mix on top of the ground meats and go for it.  There is no choice here….you have to mix this with your hands.  Wash them first.  And after.  Duh.


I baked my meatloaves in my heart shaped muffin pans.  Really fill these guys up full.  They will shrink when they bake, so you really need to fill ‘em up to maintain shape.

I topped mine with BBQ sauce because I, obviously, always have BBQ sauce on hand.  You can use your favorite BBQ sauce or ketchup.

Also, you can get these muffin pans at virtually any grocery store this time of year……

These guys baked for about 20 minutes.  I let them cool while I made the veggies and potatoes.

For the veggies….

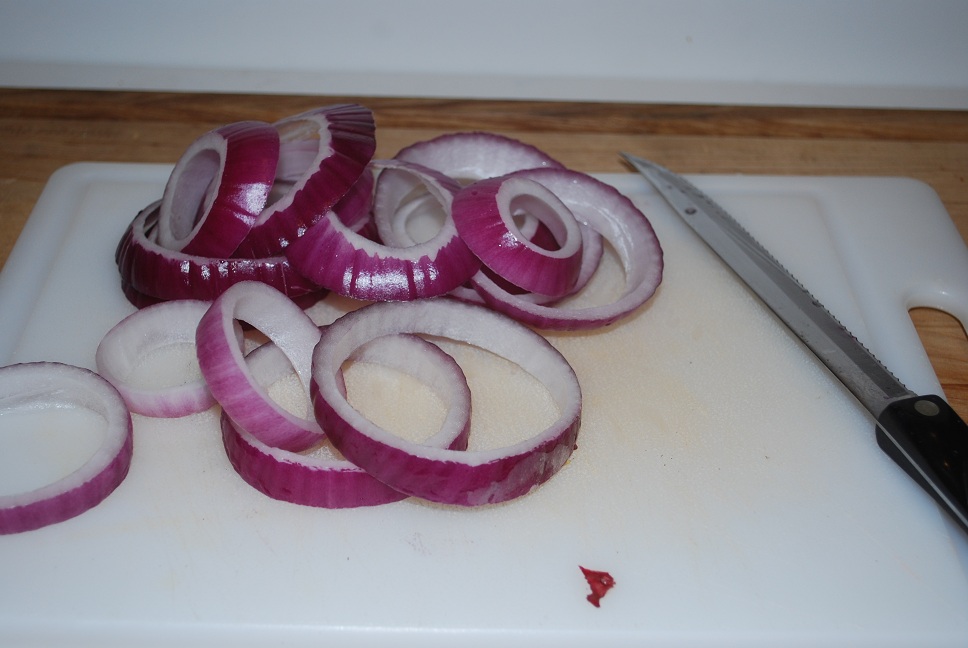
Are you wondering why I call them “Hugs and Kisses Veggies?”  I used green beans as “X” and red onion rings as my “O”.  Get it?  XXXOOO?? 

Besides being super cute, they are also yummy.  They are cooked with a bit of balsamic vinegar which disguises the fact that they are actually vegetables.  You all know my feelings on most veggies;)


I used a bag of green beans (12 ounce), red onion, butter, olive oil, garlic, balsamic vinegar, and salt & pepper.  Don’t ask me where the salt is….it somehow didn’t make the picture.


I sliced the red onion into rings.  I set aside the ones that were too little….I will use those for something else.


I cooked the beans first in about an inch of boiling water.  I put the lid on and let them steam for about 2 minutes.  Then, I ran the beans under cold water to stop the cooking.


In that same pan, with its water dumped out, I sautéed the onions in olive oil and butter.  I also added the garlic after about 2 minutes. 


Once the onions were softened, I added the beans back in.  I added the balsamic vinegar, salt and pepper.  I cooked this until the vinegar reduced and became syrupy….about 2 more minutes.

Stand back when you pour the vinegar in.  There is nothing worse than a vinegar facial.  You will think you got tear gassed.


Too plate this all up…..I put my pink potatoes onto the plate, using a heart shaped cookie cutter as my mold.  Use whatever mashed potato recipe you want, just add a few drops of pink food coloring when they are mashed and done.


I set a meatloaf on top, and then I traced around the potato heart with ketchup.  That is optional.  I just happen to like ketchup with my meatloaf….like a 4 year old.


How cute is that plate???  And even better….it tastes great too!  I think that this is a great meal to serve on Valentine’s Day.  I promise your kids will love it.  What is better than pink potatoes?

I will have a couple of cute dessert ideas for Valentine’s Day coming on Thursday…..See ya then!!

Valentine’s Meatloaf

1 pound ground beef-80/20

1 pound ground pork

1 tablespoon olive oil

1 cup sliced mushrooms, chopped to the same size as diced onion

1 cup onion, diced

1 cup smoked Gouda cheese, shredded

2 tablespoons Worcestershire sauce

10 ¾ ounce can Condensed Cream of Mushroom Soup

2 cloves garlic, minced

1 egg

¾ cup breadcrumbs

1 teaspoon salt

1 teaspoon black pepper

Topping:

BBQ sauce-optional

Preheat oven to 450 degrees.

Put ground beef and ground pork in a large bowl.  Set aside to come to room temperature.

In a sauté pan, sauté mushrooms, onion and garlic in olive oil over medium heat until softened.  This will take about 4 minutes.  Add salt and pepper to veggies.

In a separate mixing bowl, mix together cooked veggies, soup, Worcestershire sauce, egg, cheese, and breadcrumbs thoroughly.  Add this mixture to ground meats and mix well, with hands.  Do not over mix.

Fill each cavity of a heart shaped muffin pan with meatloaf mixture.  Top each with BBQ sauce, about 1 teaspoon.

Bake at 450 degrees for about 20 minutes, or until cooked through.


Hugs and Kisses Veggies

12 ounces fresh green beans, trimmed and ready

1 red onion, sliced into rings (discard rings that are too small)

1 tablespoon olive oil

1 tablespoon butter

2 cloves garlic, minced

¼ cup balsamic vinegar

½ teaspoon salt

¼ teaspoon black pepper

Bring about 1 inch of water to boil in a large sauté pan.  Add green beans and cover.  Steam for about 2 minutes.  Remove beans and rinse under cold water.  Drain.

In same sauté pan, melt butter and add olive oil.  Add onion rings and sauté over medium heat until softened, about 3 or 4 minutes.  Add green beans back in.  Add balsamic vinegar and cook until vinegar is reduced, about 2 more minutes.  Season with salt and pepper.

Friday, February 3, 2012

Super Bowl Food....Part 2

Hi everyone!  I hate being a day off with my blogs, but life got in the way this week.  Paisley and I both had a stomach bug that was a nightmare.  Needless to say, food was the last thing on my mind.  But today I am back on the horse….the food horse?  I knew I had to get the rest of my Super Bowl menu posted for you guys….it is 2 days, right?

So let’s get right to it.  I am going to start with my BBQ Short Rib Sliders…..


First off, let me start by telling you a little bit about the actual short ribs.  I sent Chris to the store to get them for me because I wasn’t feeling good enough to go out.  He brought home boneless short ribs.  My bad, I guess I didn’t tell him to get the regular bone-in kind.  But I can tell you….get the bone-in kind!  It will work with boneless, but bone-in is so much better.  The bone has tons of flavor.  I know that sounds gross, but it’s true.

I also used a diced onion, a diced bell pepper, a bottle of beer and Gourmet Rooster BBQ sauce.  Ok, you caught me….I used store-bought diced bell pepper, as you can tell my by the colors.

I serve these sandwiches on little buns (they are sliders, after all) with provolone cheese, but that comes later.


First, I browned the short ribs in hot oil, on the stovetop.  I had to do it in batches so I wouldn’t crowd the poor little guys.  This is a quick process, but a necessary one.


Then, I threw the browned (Placed actually, throwing them would be dangerous;) short ribs into the slow cooker with the onion, bell pepper, BBQ sauce and beer.  I cooked these on low for 8 hours.  Short ribs need to cook on low, and for a long time.  Don’t rush this.  The length of time is what makes these tender.  You could totally do it the night before the big game.  Let them cook while you sleep!

Once the 8 hours was done, I pulled out the short ribs.  I shredded the meat and added it back to the pot.  I also skimmed all the fat out of the pot.  There will be a lot.  Short ribs are fatty little suckers!  This meat can stay warm in the slow cooker for a long time, and your guests can serve themselves anytime during the game.  Just put some little rolls and cheese next to the slow cooker.


I love sliders.  I think they are great game food.  They are the perfect size to grab and throw on a plate with other apps.  All finger foods, all the time….that’s my motto;)

I serve this with Blue Cheese Bacon Coleslaw on the side.  People can put the slaw on their sandwiches, or just on their plate.  I’m not the slaw police.  I am not going to show you how to make the slaw, as it is crazy easy, but I will include the recipe at the end of this.  And a picture ……right now……


This is the best coleslaw you will ever eat.  Hands down.  I don’t know that that even means, but I know this slaw is the best.  I promise.

On to the Loaded Brownies…..

These brownies are “loaded” with tons of good stuff.  And you can even add more to jazz them up any way you want.  I use peanut butter chips, toffee chips, crushed pretzels and pecans.  You could totally throw in chocolate chips, crushed graham crackers, coconut, etc.

They also get a super delicious frosting that I could eat straight.  I love frosting.


What you are looking at above is oil, sugar and vanilla extract.  These brownies are super easy because you just stir everything together.  There is no beating, no mixing wet into dry or any nonsense like that.  You literally dump and mix.

I stirred the oil, sugar and vanilla together, and then I added eggs.


Once the eggs were blended in, I dumped in flour, baking powder, salt and cocoa.  I mixed all this with a spatula.


Then, in goes the toffee, peanut butter chips, pecans and pretzels.  This is a great way to use up the bottom of the pretzel bag.  I always have tons of broken ones in the bottom of my bag.


I baked these in a 13x9 pan that was lined with foil, and sprayed with cooking spray.  This will make taking them out of the pan later super easy.

These baked at 350 for about 30 minutes, or until a toothpick stuck in the middle comes out clean.

For the frosting….


In the bowl above, I have butter and chocolate chips.  I melted these together in the microwave.


Then, I stirred in sour cream and a smidge of my coffee from this morning.

This all gets beat together with about 2 cups of powdered sugar.  I just used my hand mixer to beat it all together.  This frosting is super easy, and crazy delicious.  It will make just enough to top your brownies….if you want extra, double the recipe.


Yum!  These are a great Super Bowl treat!  They are fudgy, gooey and perfect!  I know you will love them!

I hope you all have a great weekend!  I will see you next week;)


BBQ Short Rib Sliders

3 Tablespoons vegetable oil

3 ½ lbs. short ribs, usually about 3 packages

2 teaspoons garlic salt

2 teaspoons black pepper

1 medium onion, diced

1 red bell pepper, diced

12 ounces dark beer

16 ounces Gourmet Rooster Smokehouse Bacon BBQ Sauce

24 slider sized buns

8 ounces provolone cheese

Pour oil into a large sauté pan.  Pre-heat pan over medium-high heat. 

Sprinkle short ribs evenly with garlic salt and pepper.  Brown short ribs, over medium-high heat, on all sides.  This will take about 1 to 2 minutes per side and will probably have to be done in batches. 

Place browned short ribs, onion, bell pepper, beer and BBQ sauce in slow cooker.  Stir and set slow cooker on low.  Cook short ribs for about 6 hours on low heat.

After 6 hours, remove short ribs from slow cooker.  Remove bones (and discard) and shred meat.  Add meat back into the slow cooker.  Skim the fat off of the top with a spoon.

When ready to serve:

Pre-heat oven to 400 degrees.  Split buns and place a piece of provolone on each.  Toast buns at 400 degrees for about 5 minutes, or until edges are browning and cheese is melting.  Split meat, onions and peppers evenly among the toasted buns.

Makes 24 sliders


Bacon and Blue Cheese Cole Slaw

14 ounces cabbage (or one bag of coleslaw), shredded

½ cup mayonnaise

2 Tablespoons vegetable oil

1 Tablespoon champagne vinegar

¼ cup sugar

2 teaspoons celery salt

5 slices bacon, cooked, drained and crumbled

4 ounces blue cheese, crumbled

Place shredded cabbage in a large bowl.

In a small mixing bowl, whisk together mayonnaise, oil, vinegar, sugar and celery salt.  Pour over cabbage.  Stir in blue cheese and bacon.  Chill.

Serves about 6


Loaded Brownies

1 cup vegetable oil

2 cups sugar

2 teaspoons vanilla extract

4 eggs

1 ¼ cups flour

2/3 cup unsweetened cocoa

½ teaspoon baking powder

½ teaspoon salt

½ cup toffee chips

½ cup pretzels, crushed

½ cup peanut butter chips

½  cup pecans, chopped
Frosting:
½ cup semi-sweet chocolate chips
2 Tablespoons butter
¼ cup sour cream
1 Tablespoon prepared coffee
A pinch of salt (1/8 teaspoon)
2 cups powdered (confectioners) sugar
Pre-heat oven to 350 degrees.  Line a 13x9 baking pan with parchment paper sprayed with cooking spray.
In a large mixing bowl, whisk together oil, sugar, and vanilla.  Once smooth, whisk in eggs, one at a time.  Switching to a spatula, stir in flour, baking powder, salt and cocoa.  Stir just until combined.  Finally, stir in toffee chips, chopped nuts, crushed pretzels and peanut butter chips.
Pour batter into lined and greased pan.  Spread evenly.  Bake at 350 degrees for about 30 minutes, or until a toothpick inserted in the middle comes out clean.  Let cool for at least 1 hour before frosting.
For frosting:
Microwave chocolate chips and butter together, in a small heat proof bowl, for 1 minute at 50% power.  Stir and heat again for 30 seconds at full power.  Stir and heat again in 30 second increments until melted and smooth.  Stir in coffee.
In a large mixing bowl, beat together melted chocolate mixture, sour cream, salt and powdered sugar with a hand mixer.  Beat until mixture is smooth and fluffy.
Spread frosting over cooled brownies and cut into 24 squares.  Brownies should come out of the pan easily because of the parchment paper.

Share