logo

logo

Tuesday, July 12, 2011

Quick and Easy Apps

Hi guys!  I’m sitting on my porch watching the bunnies hop by.  We have cute little cotton tail bunnies that live around here.  Not jack rabbits, but actual fluffy adorable bunnies.  I am going to enjoy it right now because rumor has it that when there are a lot of bunnies….there are soon to be a lot of coyotes.  I can’t even begin to tell you how much it will freak me out if I was to stumble across a bunny carcass.  I know I live out in the woods and all, but bunnies that have been eaten by coyotes is not my thing.  Seriously, I live in fear of coyotes.  They really freak me out.  I am glad that I finally know what they look like though…..If I had seen one where we used to live, I probably would have thought it was an ugly dog, and possibly tried to pet it.  I would be pissed if a coyote ate my face off.
Ok, back to what you came for.  This last weekend, I didn’t feel like cooking an actual meal.  I was feeling more snacky.  I decided to make a meal of easy, light appetizers.  I don’t need to talk about my love of apps again with you all…..I think you know by now.  I made an appetizer that I have made before, homemade ricotta and bruschetta….and I came up with a new one, Peach and Prosciutto Flatbread.  They were both quick and easy, and I know they would impress all of your friends and family.
Let’s start with the homemade ricotta and bruschetta.  Yes, you can make ricotta at home and it is ridiculously easy.  Ricotta is a mild and creamy cheese that is super versatile.  And this ricotta puts the store bought stuff to shame.  I don’t think I ever even knew what ricotta was supposed to taste like until I made this.  The only downside is that this recipe doesn’t make a lot.  If you wanted to use it in a lasagna, you would need a ton of milk and cream.  But for a quick app, this is perfect.
For this appetizer, I used whole milk, heavy cream, white vinegar, salt and pepper, a loaf of ciabatta, olive oil, garlic, tomatoes, red onion, and basil.  The end result will be toasted slices of bread that you can top with ricotta and bruschetta topping.  Yum!
I will show you how to make the ricotta.  You will want to make this all the time….it is that good…. And easy.
I simmer together milk and cream, just until it is about to boil.  I cooked it over medium heat to avoid scorching.  I also stirred it a lot, again to avoid scorching.  It will get little bubbles around the edges when it is about to boil.
I stirred in some salt and pepper, and then I added white vinegar.  The vinegar will cause the milk/cream to curdle, which makes the cheese.  It is like a science experiment.
See how it is curdled?  Once it does this, I continued to cook it, over low heat, for about 2 more minutes.
Now the cheese has to get strained.  Do you know what would work best for this?  Cheesecloth.  Do you know what I didn’t have?  Cheesecloth.  I did it ghetto-style and used coffee filters and rubber bands. 
I had to do this slowly, as the coffee filters can’t hold too much at once.  You will be amazed at how much liquid comes out of this.  Remember, I said this doesn’t make much.  But believe me, it will be worth it.
Once the cheese is drained, you have ricotta.  How easy was that?  I never knew it was that easy to make any kind of cheese, did you?
Now is the time to make the bruschetta topping.  I diced the tomatoes, and then I pretended to dice the red onion.  I bought it diced as I am a lazy good for nothing.  I also added a few cloves of minced garlic, basil and olive oil.  I mixed it together gently and that was that.
I also sliced the ciabatta bread and brushed the slices with olive oil.  I toasted them in the oven until they were a light golden brown.
This is such a summery, light appetizer.  I could have eaten the whole thing myself, but I didn’t.  I gave everyone else a couple of bites;)
If you make your own ricotta, you will definitely impress your friends and family.  They will never have to know how easy it was to make your own cheese.  They will think it was crazy hard, and you must be a fantastic chef.  So why spoil the illusion?

My next appetizer is a Peach and Prosciutto Flatbread.  I took a lot of help from the store on this one.  I used a canned pizza dough, and other packaged and jarred ingredients.
Besides the canned pizza dough (thin crust), I also used Gourmet Rooster County Fair Peach Spread, a small onion that I caramelized, prosciutto, goat cheese, olive oil and salt and pepper.  This is basically a pizza with super fancy toppings.  It is sweet and savory, which I love.  I am hoping you do too.
FYI-I caramelized the onion in a couple of tablespoons of butter and a sprinkle of sugar.  I cooked them over low heat for almost 40 minutes.  They turn into candy!  Well, sort of. 
I start by laying the pizza dough out on a baking sheet.  It won’t stick, but I lined my pan with foil anyway.  Anything I can do to shorten clean up…I do.  If you ever meet my husband and he tells you that I do all the cooking and he cleans up….don’t buy it.  Unless by “cleaning up” he means “sitting on the couch;)”
I poked the crust all over with my fingers, not all the way through, but enough to make little wells.  I brushed the top with olive oil, sprinkled it with salt and pepper, and baked the crust for about 10 to 12 minutes.  The olive oil will help the crust get brown and crusty.
See? Brown and crusty.
I covered the entire crust with County Fair Peach Spread.  Ok, not the entire crust…I left a little border.  The peach spread will give this flatbread a sweet and spicy flavor.  Not spicy, like hot pepper spicy, more like cinnamon spicy.
I covered the peach spread with the caramelized onion, diced prosciutto and crumbled goat cheese.  The prosciutto adds yummy saltiness, and the goat cheese gives a good tang.  I, personally, love goat cheese, but you could also use Fontina if you don’t want to marry goat cheese when it becomes legal, the way I do.
I sliced the flatbread into little pieces.  My family loved this.  It is kind of different then anything they have had before.  Like I said, the peach spread makes it sweet and spicy.  It has an unexpected flavor that I promise….you will love too.
I hope that you try one of these recipes.  Summer is the time for parties, bbqs, etc.  And don’t you always want to bring something?  An appetizer is the perfect thing to bring;)  Bring one of these and you won’t be disappointed.  Nor will your friends.
I will see you all on Thursday with Part 2 of my “Boozie Cakes” series…..
Homemade Ricotta
4 cups whole milk
½ cup heavy cream
2 tablespoons white vinegar
1 teaspoon salt
½ teaspoon black pepper
Cheesecloth
In a large pot, simmer milk and cream together over medium heat.  When bubbles start to form around the edge (about 10 minutes), add salt, pepper and vinegar.  Stir and continue to cook, over low heat, for another minute.
Strain in cheesecloth.  Serve warm, room temperature or cold.
Bruschetta
12 ounces cherry tomatoes
¼ cup red onion, diced
3 cloves garlic, minced
¼ cup basil, chopped
2 tablespoons olive oil
1 teaspoon salt
½ teaspoon black pepper
Ciabatta bread of baguette, sliced and toasted
Combine all ingredients, gently.  Serve with toasted bread and ricotta.

Peach and Prosciutto Flatbread
1 can Pillsbury Pizza Dough, thin crust
9 ounces Gourmet Rooster County Fair Peach Spread
1 small onion, caramelized (see below)
½ cup prosciutto, diced
3 ounces goat cheese, crumbled
2 tablespoons olive oil
1 teaspoon salt
½ teaspoon pepper
Preheat oven to 400 degrees.  Lay pizza dough on baking sheet.  Make little wells in the dough with your fingers.  Brush dough with olive oil and sprinkle with salt and pepper.  Bake for about 12 minutes or until golden brown.
Once baked, cover crust with peach spread.  Then sprinkle on onion, prosciutto, and goat cheese.  Slice and serve.

How to caramelize and onion: Melt 2 tablespoons butter in a large skillet over low heat.  Add chopped or sliced onion.  Sprinkle 2 teaspoons of sugar over onion.  Season with salt and pepper.  Sauté, over low heat, for about 30 to 40 minutes. 


Thursday, July 7, 2011

Margarita Cupcakes

Hi everybody!  I’m sitting outside, watching the girls play.  It’s a beautiful day here!  We are lucky because we don’t actually live in downtown Reno.  I’m not saying that because downtown is bad or anything….It is just that it is hell-fire hot downtown.  We live up Mt. Rose in a forest, so it is a good 10 to 15 degrees cooler here.  It is probably close to 100 downtown, but only about 85 here.  We also had some thunderstorms here yesterday.  Those are pretty cool….They come in from over the mountains, and they are SUPER loud.  Ok, enough about the weather.  How ‘bout them Giants?;)
So today I am starting a 3 part series I like to call “Boozie Cakes”.  Yep, that’s right…cakes made with booze.  The booze cooks out, so they are safe for kids, but they still have that cocktail-ish flavor.  I think it adds a cool twist to cakes and cupcakes.  It is something unexpected, and I think it makes cupcakes seem a bit more grown up.  Today I will show you how to make Margarita Cupcakes.  I will finish this series over the next 2 Thursdays.  Next Thursday I will show you how to make a Strawberry Daiquiri Layer Cake, and the following Thursday will be a Pina Colada Bundt Cake.  Yea for Boozie cakes!
I love a good margarita.  I have to go easy on them because tequila tends to make me mean….but I still like them.  I’m mean to other people, not myself;)  A margarita is typically Triple-Sec, which is an orange flavored liquor, tequila and lime juice.  I think that the lime juice is the predominant flavor.  I really don’t feel that I ever taste the Triple-Sec.  Some people like theirs blended, while others prefer “on the rocks.”  Also, some people like their glass rimmed in salt, some don’t.  I prefer on the rocks, with salt.  The cupcakes that I am going to show you have a strong lime flavor, and they are even topped with salt!
I stuff my cupcakes to make them extra special.  I will show you what I mean by that in a bit, but for now…let me show you how to make the filling, which is a fluffy lime mousse type thing.
I start with a homemade lime curd.  A fruit curd is a cooked mixture of butter, sugar, eggs and fruit juice.  It becomes thick when cooked, almost like a pudding.  You will commonly find lemon curd in stores.  Lime is harder to find.  If you can find it…buy it!  Then you can skip this step;)
I put the lime juice, butter and sugar over a double boiler.  A double boiler is just a big bowl set over a pot of simmering water.  The water doesn’t actually touch the bottom of the bowl.  I cook it over simmering water, just long enough to melt the butter.
You have to “temper” the eggs before they can get added to the lime juice, butter and sugar. To temper the eggs just means that we will bring the eggs up closer to the temperature of the lime juice mixture.  If you add cold eggs to the lime juice mixture, which is hot, the eggs will scramble.   I take about 2 tablespoons of the hot lime juice mixture and stir it into the beaten eggs.  Once that is blended, I slowly add the eggs to the lime mixture in the double boiler, stirring constantly. 
I cook this mixture until it thickens….about 10 minutes.  When it is ready, it will coat the back of a spoon.  That means that if you were to draw your finger across the spoon, that trail would stay.  The liquid wouldn’t just run back over the trail your finger made.  Does that make sense?  That is super hard to explain!
Once mine thickened, I added 1 drop of green food coloring to make it look more lime-ish.  I poured the curd into a bowl and put plastic wrap directly on top of it to prevent a “skin” from forming.  I popped this in the fridge for about 30 minutes.
To finish the filling, I use heavy cream and a smidge of powdered sugar and the lime curd.  By this time, you will have sampled the curd and figured out that it is heaven in a bowl. 
I beat the cream in a large bowl with a hand mixer.  When the cream is almost to soft peaks, I added a bit of powdered sugar.  I continued beating until I had whipped cream.

The whipped cream and curd gets gently folded together.
It will look like this.  Then, you just pop it in the fridge till you need it.
Let’s make the cupcakes, shall we?
I use a boxed mix to keep things simple.  There are quite a few steps to this cake; I don’t need to tack on additional time by making a cake from scratch.  I use the oil and eggs that the mix calls for, but instead of water, I use a canned margarita.  The kind I chose has the alcohol already in it.  This will give the cupcakes a yummy lime flavor, with a background flavor of tequila and triple-sec.  If you have to buy them in a 6 pack, feel free to drink 4 of them.  We will need another one later.  If you drink these with me, watch yo’self.
I prepared the batter according to the package directions and baked them for about 18 minutes.
Once the cupcakes are out of the oven, and cooled a bit…they are ready to get their insides poked out so they can get stuffed!  I use an apple corer, but a paring knife would work too.  I take out about an inch of cupcake.  And then I eat every piece that gets poked out. I don’t share.  I’m like Joey from “Friends.”  Courtney doesn’t share food!  I’m kidding, I do…..obviously.
Here is a close-up of a cupcake that has been violated;)
I use my handy pastry bag with a star tip to fill my cupcakes.  A Ziploc bag is equally effective, but maybe not as pretty.  I set these in the fridge to keep the filling stiff while I made the frosting, but that is your choice.  They will be fine at room temperature.
Finally!  The last step, which is the frosting.  I use the other can of margarita, powdered sugar and softened butter.  Yes, my can is already open.  That is because I put the contents of that can in a small pot and boiled it until it was reduced by half.  This will not only cook off the alcohol, but it will intensify the flavor.  That, or I shotgunned it.
With a hand mixer, I beat the reduced margarita, softened butter and powdered sugar until I had the consistency I wanted.  I also added a drop of green food coloring to this.  I really think that a margarita cupcake needs to be green!
I frosted the cupcakes with my pastry bag and star tip.  The frosting covers up the filling so that it is a surprise.  I also sprinkled coarse sea salt on the tops of the cupcakes to complete the margarita theme.  That is optional, of course;)
These cupcakes are sweet, slightly sour, and super refreshing.  These would be great for a birthday party for a grown-up.  If you want to serve them for a kid’s party….maybe call them something else as to not freak the other parents out.  But I promise that all of your grown-up friends will love these!
Just to be clear, the alcohol cooks off so anyone can eat these.  The cupcakes are left with the delicious taste of a margarita, without any of the fight-inducing tequila effects.
Yum!  The filling is the best part!  You have to try this recipe!
I hope you all have a great weekend filled with sun, fun and margarita cupcakes!

Margarita Cupcakes
1 box white cake mix
1 can Prepared Margarita (200 ml), plus water to equal 1 cup
1/3 cup oil
3 eggs
Lime curd filling-recipe to follow
Margarita Frosting-recipe to follow
Coarse sea salt
Preheat oven to 350 degrees.  Prepare cupcake pan with paper liners.
In a large bowl, beat together cake mix, canned margarita/water, oil and eggs for about 2 minutes.  Fill cupcake liners about 2/3 full.  Bake at 350 degrees for 18 to 20 minutes, or until tester toothpick comes out clean.  Set aside to cool.
When cooled, use an apple corer or paring knife to scoop out about an inch’s worth of cake.  Fill hole with lime curd filling.
Frost cupcakes with Margarita frosting and sprinkle each cupcake with coarse sea salt.

Lime Curd Filling
½ cup lime juice
1/8 cup butter, (1/4 stick)
½ cup sugar
2 eggs, beaten
1 drop green food coloring
½ cup heavy whipping cream
1 tablespoon powdered sugar
Using a double boiler, melt butter with lime juice and sugar over simmering water. 
In a separate bowl, stir together 2 tablespoons of hot lime mixture with beaten eggs.  Slowly add the tempered eggs back into lime mixture.  Cook until thickened, about 10 minutes.  Stir frequently to avoid lumps.  Add 1 drop of green food coloring if desired.   Place curd into the refrigerator to chill for at least 30 minutes.
In a chilled bowl, beat cream with a hand mixer.  When cream is almost too soft peaks, add powdered sugar and continue beating to soft peaks.
Gently fold together whipped cream and chilled curd.  Chill until ready to use.

Margarita Frosting
1 can prepared Margarita (200 ml)
24 ounces powdered sugar
½ cup butter (1 stick), softened
1 drop green food coloring
In a small pot, boil canned margarita until reduced by half, about 5 minutes.  Let cool.
In a large bowl, beat together softened butter, reduced margarita and powdered sugar with a hand mixer until desired consistency is reached.  Add food coloring.

Tuesday, July 5, 2011

Peachy Keen Drumsticks!

Call me anything you want….just don’t call me late for dinner.  Or a blog post.  It’s late, and I had a suuuuper long weekend, but I wanted to make sure I threw a recipe at you today.  Gotta keep on schedule;)
I hope you all had a fabulous 4th of July!  We did!!  We also got some great business related news on Friday…I can’t share it with you yet, but I promise I will soon.  One fun thing we did this weekend was go to the Chicken Wing Society Cook-Off in downtown Reno.  I am up for anything that closes the street in front of the casinos.  As soon as they block the streets off, I’m in.  Seriously, I will go to any party in the street.  We tried lots of wings…which was actually uncomfortable in the 100 degree heat.  My favorite was by a company out of Las Vegas called “Havin’ an Affair.”  They weren’t too hot or too vinegary.  They were sweet and spicy, and crazy good.  Of course by the point I ate those I had partaken in a few adult beverages, and I might have said anything was good;)
The Wing Cook-Off inspired me to cook up some wings.  I actually grilled drumsticks instead of wings, but you get my drift.  I mixed 2 Gourmet Rooster sauces….Smokehouse Bacon BBQ Sauce and County Fair Peach Spread.  The result was a really smoky, spicy and sweet sauce.  They were so good!  Maybe next year I will enter the cook-off;)  If it isn’t 1000 degrees outside.
I used 2 packs of drumsticks, which is about 10 to 12.  My kids and husband love a good drumstick.  I also used slightly under ripe peaches, olive oil, poultry seasoning, and the 2 aforementioned spreads.  (Big word-I’m crazy smart, y’all)
I drizzled the drumsticks with olive oil and poultry seasoning.  Poultry seasoning is a great all-purpose seasoning.  It has sage, pepper, garlic, thyme and celery salt in it….usually.  Great with chicken….hence the name.
The peaches got a drizzle of oil and salt and pepper.  Some of you might think that mixing savory flavors with peaches is weird, but stick with me kids.  It is great, I promise!
I got the sauce started on the stovetop.  I used equal parts BBQ sauce and peach spread.  I heated it up to really get the flavors to meld together, and to get the peach spread to “loosen up” and mix in thoroughly.  It only takes a few minutes, and you could totally heat it up in a pot on the grill.
I cooked the drumsticks till they were about 95% done before I brushed on the sauce.  The sauce has a ton of sugar in it, and it will burn if you put it on too early.  I cooked the chicken, naked, for about 10 minutes.  How long you cook your chicken will depend on the size of your chicken and the heat of your grill. 
I grilled the peaches alongside the chicken.  Grilled fruit is so good-you have to try it!  And peaches and chicken were meant to be together....like me and cookies.

Please tell me you will try this.  Even if you substitute your favorite BBQ sauce (which better be mine!) and your favorite peach jelly/spread (which again, better be mine!), you have to try this recipe.  The chicken is sweet and spicy and fantastic.  The fruit spread gives the sauce a thick and yummy consistency that has to be tried!
I served the grilled peaches alongside and they were a hit too!  Addy was skeptical about grilled fruit with salt and pepper on it, but they won her over.  They will win your family and friends over too!  Watch out Chicken Wing Cook-Off….If it happens to be under 85 degrees….You are all goin’ down!

Friday, July 1, 2011

As American as .....Apple Pie!

Hi everybody!  Sorry this is a day late….Addy and I had a wee bit o’ the stomach flu on Tuesday night and thinking about food has been a struggle since then.  Of course, I chiefed it out and still cooked an amazing “Lazy Girl’s Apple Pie” last night so I could share it with you all.  I am a giver;)
Today’s post will be a quick one.  I know everyone is anxious to get their holiday weekend started….places to go, people to see, beers to drink….I will let you get to it.
This is a recipe that I have been meaning to try for a while.  I love apple pie, but the thought of peeling apples, rolling out a crust, etc. doesn’t appeal to me.  At all.  I wanted something that has all the flavors of apple pie, without the work.  That is pretty much how I feel about most things in life.  I want it all….without the work. 
This apple pie will be baked in individual dishes, using puff pastry as crust.  I am also using Gourmet Rooster Whiskey Apple Spread which means I don’t have to mess around with spices like cinnamon, nutmeg, etc.  All the spices are in the fruit spread.
I used about 7 Golden Delicious apples.  One of my apples was probably the largest apple I have ever seen, so you might want to use 8.  I chopped the apples into bite sized pieces.   I didn’t peel them.  I also tossed the chopped apples in a couple tablespoons of lemon juice, just to keep them from browning.
I also used Gourmet Rooster Whiskey Apple Spread, apple juice, sugar, butter, puff pastry and an egg.  Yes, I know egg beaters is what is pictured.  That is what I had.  Same thing.  I am only using it for an egg wash anyway.
To thicken the filling, I will be using corn starch and more apple juice.
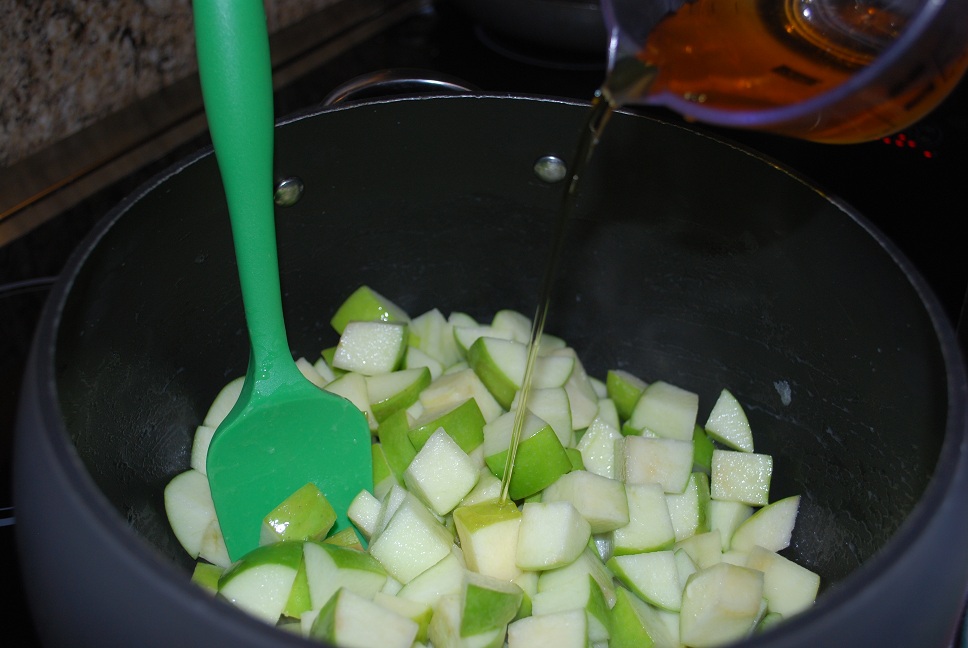
I started by putting the apples in a large pot with a couple of tablespoons of butter.  I cooked them in the butter, over medium high heat, for a few minutes to coat the apples in butter.  Then, I added apple juice.
I also added an entire jar of Whiskey Apple Fruit Spread.  I mixed it all together and cooked it for about 10 minutes with the lid on.  Then, I uncovered it and added the cornstarch/apple juice mixture and cooked the filling an additional 3 or 4 minutes.  The filling will thicken pretty quickly.
While the filling cooked, I laid out the puff pastry on a floured board.  I cut circles out of the puff pastry with a bowl slightly larger than the bowl I will be cooking the pie in.  I just used a knife….nothing fancy.
I also poked a hole in the middle of each circle with a small cookie cutter.  Actually, Paisley did.  That is her pudgy little hand;)
I filled each bowl (oven proof!) with filling and covered it with a circle of puff pastry.  I pressed the dough against the side of the bowl to seal it.  My bowls are very deep.  This made 4 pies for me, but if you use normal sized bowls, and not ones better suited for giants, this will make 6 pies.
I brushed the top of each pie with egg wash (a beaten egg or egg beaters).  I also sprinkled the tops with sugar.  These baked at 400 degrees for about 15 minutes.
Ummmmmm……ah-may-zing.  These were so good and half the work of a real apple pie.  I think this would be a great dessert to serve on the 4th of July!  Apple pie with a scoop of vanilla ice cream is the perfect summer dessert.  Or fall dessert.  Or winter dessert.  You get the ideal;)
The filling stays nice and thick.  You get just enough crust and just enough filling with this recipe.  This is the perfect pie….that really isn’t a pie at all;)
I hope you all have a great weekend!  We are having company this weekend, so my blog might be a little late again on Tuesday.  I know!  I am a deadbeat…..
Happy 4th of July!

Lazy Girl's Apple Pie
7 or 8 Golden Delicious Apples, chopped
2 tablespoons lemon juice
1 package pre-made puff pastry sheets, defrosted
2 tablespoons butter
1/2 cup apple juice
2 tablespoons corn starch
9 ounces Gourmet Rooster Whiskey Apple Spread
1 egg, beaten
2 tablespoons sugar

Pre-heat oven to 400 degrees.
Mix chopped apples with lemon juice to prevent browning.
In a large pot, melt butter over medium high heat.  Add apples and mix well.  Saute apples for about 3 minutes.  Add 1/4 cup apple juice and Whiskey Apple Spread and mix well.  Cook, covered for about 10 minutes, over medium heat.
Mix cornstarch with remaining apple juice.  Stir into apple mixture and continue cooking, uncovered, for about 3 more minutes.  Mixture will start to thicken.
While apples cook, lay puff pastry sheets out on floured surface.  Cut circles slightly larger then the bowl you plan on using.  Using a cookie cutter, cut a small vent in the center of each circle.
Ladle hot apple mixture into oven proof bowls.  Cover each bowl with one puff pastry circle, pressing dough against side of bowl to seal. 
Brush each "pie" with beaten egg and sprinkle with sugar.
Bake at 400 degrees for 15 minutes, or until tops are browned.

Share