logo

logo

Tuesday, May 17, 2011

Barnes Family Strawberry Fest!

So you probably know that May is National Strawberry Month.  Well, I am assuming you know, since it is as important as maybe Flag Day, or Arbor Day;)  It is funny to me that May is strawberry month, since living where I live…..it snowed today.  You would think they would postpone strawberry month until the whole country is sunny, like maybe July or August.  Strawberries say “summer” to me, and I didn’t feel like it was summer when I looked out the window today and had to ask Addy where her snow boots were.  Are you all sick of me complaining about the weather yet? 
This was my front yard this morning, so perhaps you can see my point.
Anyberries, we celebrated “Barnes Family Strawberry Fest” last night.  We had strawberries in every part of our meal.  Overkill?  Nope.  Strawberries are so delicious that I could eat them all the time.  I think they might be my favorite fruit.  If you agree, you will love today’s recipes.
I started with a spinach salad with a strawberry vinaigrette.  I know that sounds kind of odd, but you see raspberry vinaigrettes everywhere, so why not a strawberry version?
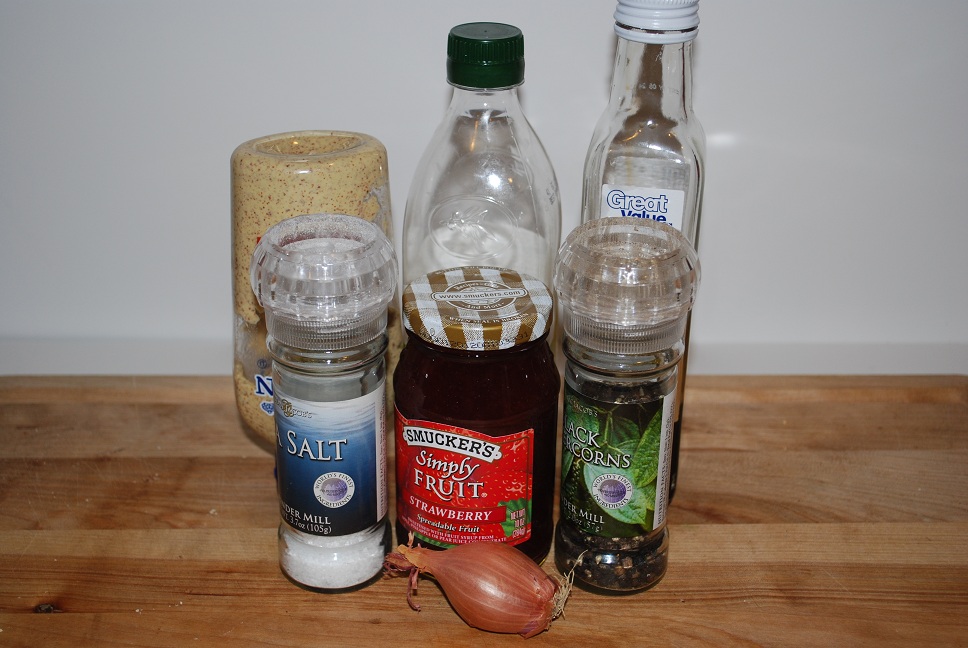
For my vinaigrette, I used a little baby shallot, strawberry jam, balsamic vinaigrette, Dijon mustard, salt and pepper and olive oil.  You can use a strawberry jam, jelly or preserve….your choice.
My first step was to grate the shallot into the bottom of my mixing bowl.  This gave me the flavor of the shallot, but no big chunks.  If you don’t have a micro plane, you could always just mince your shallot very finely. 
Then, I added my jam, mustard, balsamic vinegar, and salt and pepper.  I whisked this together, and then I streamed in the olive oil….all the while whisking.  This is a thick dressing.  The mustard and jam will both thicken this.  Don’t be tempted to add too much olive oil in an effort to thin it out…..Just make your peace with a thick dressing.
I served my strawberry vinaigrette with a spinach salad.  I put strawberries, sautéed shrimp, gorgonzola cheese and candied almonds on my salad.  With this dressing, it was one of the best salads I have ever had.  Period.  I usually prefer creamy dressings to vinaigrettes, but this dressing won me over.  So, so good.  And it tastes so fresh and fruity!
It turns out a really pretty color too!
My next recipe is for a strawberry chicken salad.  I love chicken salad….You know the one that usually has grapes or apples in it, with mayo?  I decided to try it with strawberries.  Actually, I created this recipe a couple of years ago when I had too many strawberries, and Addy was beggin’ for chicken salad.  It is our family favorite now.
For this recipe, I used 3 chicken breasts that I had grilled and shredded.  Chicken salad is such a good “use-up” for leftover grilled chicken.  Whenever we grill, we always grill double the amount we think we will eat…..because I love me some leftovers.  I also used strawberries that I had diced, sliced almonds, diced celery, mayo, poppy seed salad dressing and salt and pepper.
Chicken salad is super easy to make.  I dumped the chicken, strawberries, celery and almonds into a bowl.  Ummmm-even Paisley could make this.  Or Chris, and that says a lot.  That says more than saying Paisley could make it because I am pretty sure Chris doesn’t know how to boil water.  He would at least have to ask me how to turn on the stove.
Then, I added the mayo and poppy seed dressing, and mixed….gently.  I want everything to stay whole and not turn into a mush.
That’s it.  From here, you can eat it in a sandwich, on crackers, on greens, or by itself.  We ate it on ciabatta rolls because we have a household obsession with sandwiches.  Or rather, I do and I force it upon them.  What can I say?  The chef/mommy makes the rules.
If you will notice, the right side of the picture…..right when I was about to take the picture…Paisley stole a chunk of chicken salad right out of the sandwich.  Darn kid.  But who can blame her….This chicken salad is to die for.
Lastly, I made a berry shortcake for dessert.  I always make my own shortcakes.  I hate, HATE, those weird cake-like things that are supposed to pass for shortcakes that you get by the produce section.  I don’t mean to be rude, as I realize you might like them…..I just don’t.  I think they taste like a stale Twinkie.  And anyway, shortcakes are crazy easy to make.  And quick too!  Here is how I did it…..
I used Bisquick, sugar, heavy cream, butter, apple pie spice and vanilla extract.  I love Bisquick.  You really can make just about anything with it…..You should always have Bisquick in your pantry.  You never know when you will need an emergency supply of drop biscuits;)
I stirred the dry ingredients together….the Bisquick, sugar, and apple pie spice.  If you can’t find apple pie spice, you could always substitute pumpkin pie spice….or cinnamon, nutmeg and ginger.
Then I added the butter, vanilla and cream.  Pretty quickly, you get a sticky dough.  Don’t over mix, just mix until a soft dough forms.
I used a large ice cream scoop to drop these onto an ungreased cookie sheet.  These only bake for 10 minutes.  See how easy this is?  There is no reason to buy shortcakes!!
While my shortcakes baked, I added a bit of sugar to some strawberries, blueberries and raspberries.  This will bring some of their juices out and make them super yummy.
We ate our shortcakes with vanilla ice cream, but whipped cream would be good here too.  Or both.  Both would be fantastic;)  Berry shortcake should be your “go-to” dessert recipe this summer.  People will be so impressed that you make your own shortcakes, and they never have to know how easy it was!  Plus, berries are so good in the summer…..and spring too.  Unfortunately, we had to eat ours by the heat of our fireplace, instead of outside….enjoying a warm spring night……..
I hope you try these strawberry recipes!  Maybe not all at once, like us…..unless you already had a family “strawberry fest” planned.  People do that, right?
Ok, remember, I promised you a give-away????  Here are the rules.  On my Gourmet Rooster Facebook page, message me which picture has a baby foot in it.  We can go ahead and use numerical order…the first picture being number one, etc.  I will put all the correct answers into a hat, and pick a winner.  The winner wins this bracelet…..
This fabulous bracelet was provided by my Stella and Dot stylist, Lexie Hinds, (www.stelladot.com/sites/lexiehinds).  Have you looked at Stella and Dot’s latest stuff?  You should check her page out!
You must message your answer by Thursday at noon, Pacific Time.  I will ship the bracelet to the winner that afternoon!  Good luck!
Strawberry Vinaigrette
1 small shallot, grated to equal about 1 tablespoon
¼ cup strawberry jam
1 tablespoon Dijon mustard
¼ cup balsamic vinegar
1 teaspoon salt
½ teaspoon pepper
About 1 cup olive oil
Whisk together all ingredients except olive oil until blended.  Slowly stream in olive oil, while whisking. 

Strawberry Chicken Salad
3 chicken breasts, grilled and shredded
½ cup slivered almonds
½ cup celery, diced
½ cup strawberries, hulled and diced
½ cup mayonnaise
¼ cup poppy seed salad dressing
Salt and pepper to taste
Gently stir together all ingredients.  Chill for at least one hour before serving.

Berry Shortcake
2 & ½ cups Bisquick
3 tablespoons butter, melted
3 tablespoons sugar
1 tablespoon apple pie spice
1 tablespoon vanilla extract
½ cup heavy cream
Pre-heat oven to 425 degrees.
In a mixing bowl, stir together Bisquick, sugar and apple pie spice.  Add butter, cream and vanilla, stir. 
Drop with a large ice cream scoop onto an ungreased baking sheet.  You should get about 6.  Bake at 425 degrees for 10 to 12 minutes
Serve with mixed berries and vanilla ice cream

Saturday, May 14, 2011

What's That? It's So Fancy!

It's a Peaches and Cream Charlotte!......

So we have a new obsession at our house….Madeleine cookies.  Have you guys tried them?  You know, the shell shaped cookies that you get at coffee places?  Yep, those.  We have been getting ours at Wholefoods.  The kind we get are made by Donsuemor.  Donsuemor is the company that makes the Madeleines that you get at Pete’s Coffee.  There a whole bunch of other places that you can get them too……If you look at their website (www.donsuemor.com).  There is a cute story of how Madeleines got their name too. 
Anycookie, I wanted to create a dessert using the Madeleines.  They are so pretty that I knew I could come up with a dessert recipe that was really easy, yet would look super fancy.  I think that is the best kind of recipe…You know, the kind that people think you spent a ton of time on, but really it took you 10 minutes?  Doesn’t that remind you of the old Rice Krispy treat commercial?  When the woman makes the treats in 5 minutes, but then splashes flour on her face and pretends it took her forever??
So after eating a whole pack of Madeleines myself, while I was in deep thought;), I came up with a great recipe for a Peaches and Cream Charlotte.  A Charlotte is an “ice box cake” made with soft cookies such as a Madeleine.  I won’t get into its history any more then that….as this is a food blog, not a history lesson.   But it is super easy, and looks amazing.  Besides a bunch of Madeleines, the other thing you have to have is a spring form pan.
To make this Charlotte, you need about 24 Madeleine cookies.  So don’t buy them at the counter at Pete’s, unless you like to buy them in small amounts;)  I also used heavy cream, almond extract, powdered sugar, frozen peaches (defrosted), Gourmet Rooster County Fair Peach Spread and sliced almonds.
I love fresh peaches, but I had to face the facts that it just isn’t peach season here in Northern Nevada.  I find frozen peaches to be better than canned, but you really can use whatever you have…..frozen or canned. 
I lined my spring form pan with the cookies.  I faced the pretty side of the cookie out because that is what you will see when the sides of the pan come off.  I also lined the bottom with cookies.  I broke the cookies in half to make them fit where needed.  That won’t show, so you don’t have to make it as pretty on the bottom. 
The next step is to mix your defrosted peaches with the peach spread. The peach spread will give great flavor to this cake.  It is spiced with cinnamon, nutmeg, ginger, etc.  If you can’t find it, you could always use regular peach jam, but it won’t be nearly as good;)  Gourmet Rooster County Fair Peach Spread comes in 9 ounce jars.  You will need about 3/4th of the jar.  Save the rest for a PB&J…..
-You can find Gourmet Rooster products at www.gourmetrooster.com, Draeger’s, The Cheeseboard, The Royal Rooster, Piedmont Grocery, Maynard Station, Evergreen Gifts, Market Square Cheese, and Thrifty White.-
Stir gently so you don’t break up the peaches!
Finally, the cream needs a good whippin’.  I used about ½ of my little pint container.  You will also need to put about 1 tablespoon of almond extract in with your cream.  You will need to beat the cream until soft peaks are about to form.  At that point, you add 1 tablespoon of powdered sugar and continue beating until you have whipped cream.  Don’t whip for too long or you will get butter.  Sweet almond flavored butter.  Which sounds good, but not for this recipe.
Once the cream is whipped, you just layer the ingredients over the cookies.  The first layer is the peaches.  Then I spread the whipped cream on.  I topped the whipped cream with the sliced almonds, and popped the whole thing in the freezer for at least an hour.  Remember, this is an ice-box cake.  I am assuming you don’t have an old fashioned ice-box, so go ahead and use your freezer;)
Ta-da!  Finished product…..I told you it’s pretty!  And nobody has to know how easy it was to make….unless they read my blog too.  The whipped cream and peaches meld together when this cake freezes, and it becomes almost like ice cream.  The cookies keep their yummy cake like texture, and of course taste delicious.  I also love the almond in this recipe.  Almonds and peaches were made for each other….like Brad and Angelina, Barbie and Ken, Maria and Arnold…oops, bad example.  But you get my point;)
Who wouldn’t want to eat this?  You can make it now!  Tonight!  Get yourself some Donsuemor Madeleines!  And fresh peaches if you can……
Peaches and Cream Charlotte
Donsuemor Madeleine Cookies, about 24
16 oz. bag frozen peaches, defrosted
6 oz. Gourmet Rooster County Fair Peach Spread
½ pint heavy whipping cream
1 tablespoon almond extract
1 tablespoon powdered sugar
¼ cup sliced almonds

Cover the bottom of an 8 inch spring form pan with Madeleine cookies, curved side facing down.  Line the sides of the pan with the curved side facing out.
Mix together the defrosted peaches with the peach spread.  Cover the cookie layer with the peaches.
In a large bowl, using a hand mixer, beat together the whipping cream with the almond extract.  When soft peaks have just started to form, add the powdered sugar.  Beat until desired consistency is reached.  Spread whipped cream on top of peach layer.  Top with sliced almonds.
Place cake in freezer for at least one hour.  Let sit for 10 minutes before slicing and serving.

Tuesday, May 10, 2011

Risotto-Not as Hard as You Would Think!

Good morning!  Another beautiful spring day!  At least it better be.  It snowed here yesterday and that was totally unacceptable.  You hear that Mother Nature?  Unacceptable!  The rest of the week should be better….I guess this is spring in the Sierras.  Oh well, at least it gives me more time to get bathing suit ready;)
Yesterday, I made one of my husband’s favorites for dinner…..Chicken Caprese Risotto.  I thought I would share the recipe with you for one main reason.  Well Ok….2 reasons.  The first is because it is amazing, but the other reason is because I want to show you that risotto is actually really easy to make.  I think that a lot of people are intimidated by it, but I promise….it is easy!  You don’t spend hours at your stove stirring, stirring and more stirring.  It takes about 20 minutes, and yes…you can step away from your stove.  I’m not saying you can walk the dogs, or put in hot rollers, but you can walk away for a bit.
I use part of a rotisserie chicken for this recipe, but it is a perfect recipe to use up grilled chicken that you may have left over.  A “Caprese” salad is mozzarella, tomatoes and basil, and all three of those are featured in this recipe.  I just took the salad out….you know I don’t be messin’ with salads;)
In my recipe, I use rice, chicken stock, white wine (any kind), a shallot, parmesan cheese, garlic, and the aforementioned chicken, mozzarella, basil and tomatoes.  Normally Arborio rice is used in a risotto, but my local grocery store was out.  I substituted a short grain rice, which works just as well.  You can really use any short or medium grain rice.  These are starchier then a long grain.  The starch is what makes a risotto.  As the rice cooks, it releases the starches which makes it creamy, without needing to add cream.  So bottom line, shoot for Arborio, but stay away from long grain.
I prefer to use chicken stock, as opposed to chicken broth.  I think it has a richer flavor.  You can find chicken stock right by the broth.  Or…you can be overly ambitious and make your own.  Good luck.
The mozzarella I used was fresh and it was in little “pearls”.  You can use any fresh, just cut it down to size if needed.
I started the recipe by putting the diced shallot in a large sauté pan with a couple of tablespoons of olive oil.  I also used my fancy garlic press to press the garlic in.  If you don’t have a garlic press, just mince it really fine.  I let this cook for a few minutes, just until it is translucent.  Don’t brown the shallot….just let it sweat a bit.
The next step is to add the rice.  I cook the rice for a few minutes with no liquid.  I stir it around in the fat and shallots/garlic while it cooks.  The rice will get a bit toasty, which helps with the flavor.  When it is ready for the first of the liquid, the rice will start to look translucent.  You should recognize this by now, since we did the same thing with the shallot;)
The first liquid I add is the white wine.  I used Chardonnay that I already had in the fridge.  You cook the rice in the wine, over medium heat, until it is almost all absorbed.  You will need to stir occasionally.  This will take about 2 minutes.  The rice will start to look dry, like it needs more liquid.  It is screamin’ for it!
See how the liquid is absorbed?  Now it time to start adding the broth.  I had been heating the broth in a separate pot.  You want to add warm broth to the rice…..I add it by ladleful, about 2 at a time.  Same idea as with the wine.  You will stir occasionally, and add more when the liquid is absorbed.
After about 20 minutes, you will have probably gone through about 4 cups of broth.  Taste the rice…it should be cooked by now.  It will look like porridge.  It will be thick and creamy.
At this point, I add parmesan cheese.  I grate mine right in.  It will melt in and make the risotto even creamier.
I stirred in the chicken and tomatoes that had already been chopped into bite sized pieces.  My chicken was still warm, since it was fresh off the bone….and fresh off the grocery store warming shelf.  I also stirred in the mozzarella, which was drained of its liquid.
At the last minute, right before serving….I add the basil.  I wanted to keep the basil as fresh tasting as possible, so it is a last minute addition.  Do you know how to cut basil?  Stack up a bunch of leaves and roll them up, lengthwise.  Then cut across.  You will get ribbons of basil.  This is called a chiffonade.  Fancy;)
Yum!  You can see how creamy it is….even in the picture.  My whole family loves this…even the kids.  They are willing to overlook the slight wine taste if there is a bunch of cheese;) 
I hope you make this just so you can see how easy risotto is to make at home.  I didn’t stand at the stove stirring constantly.  I had to step away to feed the dogs, answer the front door, change the TV channel, etc.  It does take some effort, but it is so, so worth it!  I hope you try it!

Chicken Caprese Risotto
2 tablespoons olive oil
1 small shallot, diced
3 cloves garlic, minced
1 & ½ cups Arborio rice
½ cup white wine
4 cups chicken stock
¼ cup parmesan cheese, grated
1 cup grilled chicken, cut into bite sized pieces
1 cup cherry tomatoes, sliced in half
½ cup basil, torn or cut into ribbons
¾ cup fresh mozzarella, cut into bite sized pieces
Salt and pepper to taste
Heat stock in a pot, over low to medium heat.
In a large sauté pan, heat olive oil.  Add shallot and garlic and cook until translucent, about 3 minutes.  Add rice and stir to coat in oil.  Cook rice over medium heat until translucent.
Add wine to rice and stir.  Cook until wine is absorbed.  Add warm broth, about ¼ cup to ½ cup.  Stir and cook until broth is absorbed, on medium to medium high heat.  Repeat with remaining broth, adding ¼ cup to ½ cup at a time.  After about 20 minutes, the rice will be cooked.
Add parmesan cheese and stir.  Add remaining ingredients and salt and pepper to taste.

Thursday, May 5, 2011

And They're Off.....

The horses that is.....

Good morning!  I have a super busy day planned so I had to get up really early to write this.  Like 5:45am early.  I rarely get up before 7:30am.  I am not a morning person.  I really am not a night time person either….I guess I have a good solid 2 hours in the afternoon when I really shine;)  But anyway, I am up and writing.  I had no idea that the sun was up this early……
This Saturday, May 7th, is the Kentucky Derby!  Do you watch horse racing?  I don’t watch it on a regular basis, but I do get excited about the Derby.  Perhaps it is my fascination with hats that makes me watch the Derby.  The women wear fantastic hats.  Almost like “Fascinators” at the Royal Wedding, but more “Southern”.  I wish I was going so I could wear one.  My mom would tell me that I look like a thumbtack, but I think I look awesome in hats;)
Derby food is good traditional Southern food……obviously, as the Kentucky Derby is in Kentucky;)  This year, I chose to make a “Kentucky Hot Brown” to celebrate.  A Hot Brown is an open-face sandwich that was created at the Brown Hotel in Louisville, KY in the 1920’s.  It is turkey, bacon, and tomatoes….smothered in a cheese sauce and popped under the broiler until the sauce gets brown and bubbly.  I am thinking this wouldn’t be a good dish to serve at the actual Derby…..it is messy and those fancy ladies don’t want cheese sauce down the front of their dresses.  But since it is a popular dish throughout the state of Kentucky…..I’m making it…..or a version of it…..
I say a “version” of it because I turned this sandwich into a casserole.  I wanted to make it easier to make in a large quantity…something just a bit more substantial.  The final product was crazy good.  Seriously, you have to make this….and not just for the Derby.  This will become a family favorite.
I will start by showing you how to make the cheese sauce.  This is supposed to be a traditional Mornay sauce, which is a white sauce with parmesan cheese and Gruyere cheese thrown in.  I used Gruyere, but I used sharp cheddar instead of parmesan.  I also used butter, flour, milk and some Gourmet Rooster Carolina Style BBQ Sauce.
This sauce starts with a roux.  A roux is fat cooked with flour.  It thickens liquids.  This will be a “blonde” roux, which means it will be light.  Sometimes a roux is cooked for a long time, until it is the color of a penny.  We aren’t doing that here……this will be quick and easy.
Above is a picture of the roux when the flour has just been added to the melting butter.  It is whisked to combine, and then cooked for a minute or so to get the floury taste out.
I slowly added the milk, and once the mixture boils, it thickens.  Once the mixture is smooth, you can stop using a whisk and switch to a spatula.  At this point, I added the BBQ sauce.  If you don’t have Gourmet Rooster Carolina Style sauce, you can substitute about ¼ cup of plain mustard, a squirt of Worcestershire and some black pepper.  But…..this sauce is readily available at The Royal Rooster in Clayton, CA, Maynard Station in Virginia City, NV, The Cheeseboard in Reno, NV and Piedmont Grocery in Oakland, CA.  An online…..get yo’self some.
Time for the cheese!  I stirred constantly while adding the cheese.  This sauce will be thick!  Once you know how to make this sauce, it can be used for so many things….mac and cheese, a sauce for veggies, etc.  I could eat it straight out of the pot…..just as it is.  I love cheese.
To assemble the rest of the casserole, I used sourdough bread, turkey, cooked bacon, tomatoes, and chives.  I cut the bread into bite sized pieces and put them in the oven to toast.  I toasted them at 400 degrees until they were browned a bit.  I wanted to get the bread to harden a bit.  If the bread was too soft, it would have become really soggy in the casserole.  To keep this from happening, I turned the bread into croutons.
I also chopped the turkey, cooked bacon and tomatoes into bite-sized pieces.  I used turkey that I got from the deli….so just lunchmeat turkey.  If you, for some reason, had turkey sliced right off the bird…..that would be amazing in this.  FYI-the chives are just for garnish.
I put the toasted bread into a greased 13 x 9 casserole dish.  It should cover the entire dish.
I covered the bread with the turkey, bacon and tomatoes.  Make a nice even layer.
Then, I poured the cheese sauce over the top.  I used a spatula to even it out a bit.  When this bakes….the cheese will go down into all the nooks and crannies.  Yum.
This is what it looks like when it is done.  The cheese gets all brown and bubbly.  I sprinkled the chives over the top for a bit of color, plus….I love the mild onion flavor of chives.  I let it cool a bit, and then dove in.
Ummmm….are you kidding me right now?  A casserole consisting of bread and cheese?  Yep, best thing ever.  The bread absorbs the cheese, but doesn’t get soggy.  The bacon and turkey add a nice salty bite, and the tomatoes still taste bright and fresh.  This casserole would be amazing served at a Derby party, and any other time of the year.
Oh but wait….I’m not done yet….
How about finishing the meal with a Mint Julep Milkshake?  A traditional mint julep comes straight out of Kentucky.  It is Kentucky bourbon, mint, sugar and water.  I used Kentucky Bourbon, vanilla ice cream, a bit of milk, mint extract and a dash of green food coloring.  I blended it in the blender and it was done!  So much better than a regular julep.  It has to be….it has ice cream in it.  For the kids, just take out the Bourbon;)
Kentucky Hot Brown Casserole
1 lb. loaf of sourdough bread, cubed
1 lb. bacon, cooked and chopped into bite-sized pieces
12 ounces tomatoes, chopped
1 lb. turkey, chopped
1 lb. sharp cheddar cheese, grated
½ lb. Gruyere cheese, grated
½ cup butter (1 stick)
½ cup flour
3 ½  cups milk
½ cup Gourmet Rooster Carolina Style BBQ Sauce
Chives for garnish
Toast bread cubes in 400 degree oven until browned, about 10 minutes.
Melt butter in large pot.  Add flour, whisking constantly.  Cook for 1 minute.  Slowly add milk, whisking constantly.  Simmer until mixture boils and thickens, about 4 minutes.  Stir in BBQ Sauce and cheeses.  Cook over low heat until cheese is melted.
Layer bread cubes in the bottom of a greased 13 x 9 dish.  Layer turkey, bacon, and tomatoes over bread.  Top with cheese sauce and spread evenly.
Bake at 350 degrees, uncovered, for 25-30 minutes, or until cheese sauce is browned and bubbly.  Top with chives.

Mint Julep Milkshake
2 ounces bourbon
1 cup vanilla ice cream
1 tablespoon mint extract
1 cup milk
Dash of green food coloring
Ice
Combine all in blender and blend until smooth.  Garnish with fresh mint.
Serves 2

Tuesday, May 3, 2011

Mother's Day Treats!

Hello everyone!  I want to thank everyone that came out to the Clayton Art and Wine Festival to say “hi” to us!  We had such a great time!!  The Royal Rooster is such a fantastic store…..perfect for Mother’s Day gifts….so get your little tushes over there and shop for mom!  Speaking of Mother’s Day…..
Today’s post is 2 recipes that would be great for Mother’s Day.  One is breakfast (breakfast in bed?), and the other is dessert.  If you are a mom or grandma, and you want your family to cook for you this Sunday……stop reading this now.  Pass this off to your kids, husband, grandkids, kindly stranger off the streets (kidding on that one), etc.  Seriously, stop reading now.  Send the link to whoever will be cooking for you.
Ok, those reading this now should be the ones that want to surprise mom or grandma with breakfast in bed….and then some dessert.  The recipes I am going to share with you are SUPER easy.  You will be able to do this, even with virtually no cooking experience.  But we will be using the stove and oven, and some booze, so kids…..grab an adult.  NOT MOM!  Grab dad, or another adult who is handy.  I am going to show you how to make Amaretto Pancakes with a Cherry Sauce and Cheesecake Stuffed Chocolate Cupcakes.  Sounds good, right?
Let’s start with the pancakes….
Check what you already have in your cupboards and fridge.  You may need to go to the grocery store to get what you don’t have.  You will need baking mix (Bisquick), Amaretto (an almond flavored liquor that will require an adult to buy for you), baking powder, butter, milk, eggs, powdered sugar, almond extract and cherry pie filling.  We will be using cherry pie filling because cherries really aren’t in season yet.  Plus, I don’t want to make you pit a pound of cherries.  That would make a mess all over mom’s kitchen…..and we want to stay away from that.
For the pancake batter, you will use 2 cups of the baking mix, 2 eggs, ½ cup amaretto, ½ cup milk, 2 teaspoons baking powder and 2 tablespoons powdered sugar.  You whisk this all together until the lumps are gone.  This batter needs to sit for 10 minutes, so while it sits….preheat your griddle or pan.  Yes, this is a grown-up job.
After you butter up the griddle, drop the batter onto the griddle using a measuring cup for easy pouring.  The pan or griddle should be on medium heat. 
Do you see how the edges are starting to bubble?  This means the pancake is ready to flip!  It will take about 3 minutes per side.  Keep the pancakes warm in low oven, set to about 170 degrees.  Now, let’s work on the sauce.  Easy so far, right?  Mom will love it!
Empty the can of pie filling into a small pot.  Add about 1 tablespoon of almond extract.  I use extract here instead of amaretto because I don’t want to thin out the sauce too much.  Extract has a stronger flavor.  This needs to be heated through….just until it is warm.
Yum!  These pancakes just need the fruit spooned over the top….no butter needed.  You could also top the cherries with whipped cream if you had some.  FYI-that yellow spot is a weird glare in the picture….not some strange addition to the sauce.
Mom or grandma will love this!  I know I would like to get breakfast in bed!!  And the Amaretto adds such a special touch…..the almond flavor works so well with cherries. 
Onto the cupcakes…
Moms love chocolate, right?  I know I do, as does my mom….and every other mom I know.  We also love cheesecake, so I have combined the two.  The cake will be from a mix, the cheesecake from the store and you will make the frosting yourself.  Easy peasy.
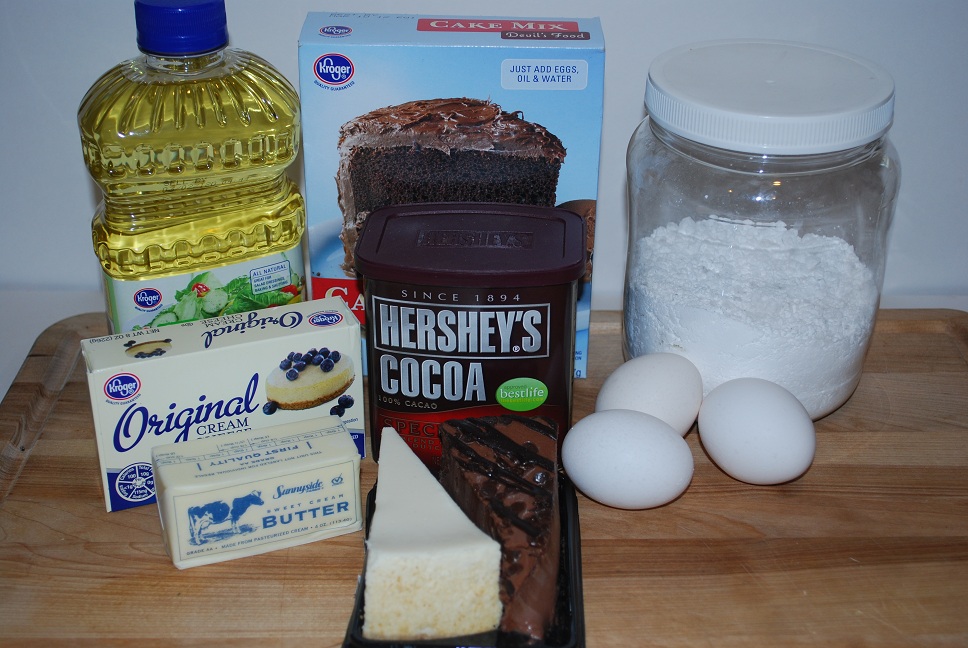
Normally I don’t like to use cake mixes….not because I am snotty, but because I think from scratch is just as easy.  But, today we will use a mix…just to make it easier for you.  You might not have all the ingredients for scratch cake, and it is easier to use a mix.  You will need a chocolate cake mix, oil, eggs, cheesecake (any flavor), dark unsweetened cocoa, powdered sugar, cream cheese (room temperature) and butter (room temp as well).  You will also need a liquid of some sort, but we will get to that in a minute.
First things first, cut your cheesecake into chunks.  I used 2 slices that I bought in the bakery at the grocery store.  You can also use cheesecake bites that you get in the freezer section, or a frozen whole cheesecake.  Freeze your cheesecake chunks for at least one hour.  You want them to be frozen when you put them in the cupcakes….this way they won’t melt and disappear into the cupcakes.
In the bowl above, I have the cake mix, 3 eggs, ½ cup vegetable oil, and 1 and 1/3 cups liquid.  The box says use water, but I never do.  This is your chance to pep up your cupcakes.  I use leftover coffee for chocolate cake.  You could use milk, soda, or water like the box says. 
With a hand mixer, you will beat the batter for about 2 minutes, scraping occasionally.
Scoop the batter into paper liners.  Fill the cups about 2/3 full.  This will make about 24 cupcakes.

Now, you will poke your cheesecake chunks into the batter.  Not too far, you don’t want them to touch the bottom.  The batter will rise up around the chunks as the cupcakes bake, so don’t worry about the chunks being covered in batter.
The cupcakes will bake at 350 for about 15 minutes….unless you are above 4500 feet.  I am at 6000 feet so I bake mine at 375.  Altitude really does make a difference!  Ask a grown-up to explain why that is….and then call me and tell me because I really have no idea.
See how the cupcakes bake up and around the cheesecake?  Let the cupcakes cool for at least one hour before you frost them.
The frosting is easy and quick to make.  Place the brick of softened cream cheese, the butter and 2/3 cup of cocoa in a large bowl.  Beat this together with a hand mixer until the mixture is smooth.
Slowly add the powdered sugar and beat that too.  You will probably use about 3 cups.  If your frosting gets too thick, you can add a smidge of milk.  Continue beating until you have thick, delicious frosting.
See how the cheesecake makes a special little treat inside?  It will be a welcome surprise, I swear!
These cupcakes are so yummy, and your mom or grandma will be so impressed that you made them!  Promise me that you won’t eat all of them before your mom can have any…..And promise me that you will clean any mess that you make!  Your mom will love all of the effort that you are putting in to this.  Moms deserve it….I know I do;)
If you make this for your mom…. Post some pictures on Facebook.  I would love to see them!

Amaretto Pancakes with Cherry Sauce
2 cups baking mix
2 eggs
½ cup Amaretto
½ cup milk
2 teaspoons baking powder
2 tablespoons powdered sugar
1 tablespoon almond extract
1 can cherry pie filling (21 ounces)
Whisk together above ingredients.  Let batter sit for 15 minutes.
Pre-heat griddle or large pan to medium.  Grease pan or griddle with butter.  Pour batter onto pan with a measuring cup, dropping about 1/4 of a cup at a time.
Cook pancakes about 3 minutes per side, or until golden brown on each side.
For sauce, heat pie filling and almond extract until warm.  Serve over pancakes.

Cheesecake Stuffed Chocolate Cupcakes
1 box chocolate cake mix
3 eggs
½ cup vegetable oil
1 ½ cups water or other liquid
2 slices cheesecake, any flavor
8 ounces cream cheese, softened
1 stick butter, softened
2/3 cup dark unsweetened cocoa
3 cups powdered sugar
Preheat oven to 350 degrees.
Cut cheesecake into bite sized pieces.  Place in freezer for at least one hour.
In a large bowl, beat together cake mix, eggs, oil and water.  Beat, with hand mixer for 2 minutes.  Scoop batter into paper liners, filling 2/3 full.  Place one cheesecake chunk into each cupcake.  Bake at 350 degrees for 15 minutes.
Frosting:
In a large bowl, beat together cream cheese, butter and cocoa.  Slowly add powdered sugar until desired consistency is reached.  Frost cooled cupcakes.


Share