Friday, June 29, 2012

Easy 4th of July Desserts


Hi guys!  Whew-it’s been a long week.  I am rarely this busy, but I was actually crazy busy this week.  That’s tough for a gal who is super lazy, like me.  I had a hard time fitting in any cooking, let alone 4th of July desserts….but I did bust out a couple.  And because I was so busy this week, they are super duper easy.  Not like anything I make is hard or anything.  In fact, I usually stick to simple, family friendly stuff….but these two recipes are beyond easy.  I figure I am going to be just as busy next week, so I might as well keep it simple for the 4th.

My first recipe kind of stems from some friends I had (still have!) when I was a kid.  There was a family that I use to spend time with that liked their apple pie with cheese on it.  I remember the first time their mom, Wanda, asked me if I wanted a piece of apple pie with cheddar cheese on it, and I thought she had lost her marbles!  I never tried it as a kid.  I have changed my tune since then.  I have discovered that I LOVE apples and cheddar together, so I decided to make mini apple cheddar pies.  Nothing says “America” like apple pie, right?  You can’t get more patriotic then apple pie, so this is perfect for the 4th!


For this crazy, ridiculously easy recipe, I used pre-made pie dough, canned apple pie filling, sharp cheddar cheese and that egg up there is for an egg wash.

You could totally use your own apple pie filling recipe for this.  I, personally, don’t have a problem with canned apple pie filling.  Also, the sharp cheddar cheese is such a strong flavor…the apples are more of a background note.

If you are wondering why I didn’t use my Whiskey Apple spread for this…..I wanted bigger pieces of apple.  There you have it.


I unrolled my pie dough onto a floured board.  Then, I poked out a bunch of circles with a cookie cutter.  You can use whatever size you want.  You could even trace around a bowl.  I chose a cookie cutter that will make small, maybe two bite pies.


I put a bit of filling and a piece of cheese on one side of each circle.  You really don’t want to overfill these.  This is a case where less is more.  Normally I wouldn’t say that…because more is always more, but you don’t want these babies exploding.

You really don’t need a recipe here.  It is just filling and cheese.  Use your judgment to figure out how much to use.  I believe in you.


I sealed the pies together with a fork.  This also gives them a pretty edge.  I also cut a slit in the top of each pie.  This is a necessary step….trust me.  Otherwise, these things will explode in your oven.  I am still in a new, clean house.  I don’t need any exploding pies in my clean oven.  Mainly because I have no clue how to clean an oven.


My last step was to paint egg wash over the tops of each pie.  This was a beaten egg and a splash of water. 

I baked these at 425 degrees for about 15 minutes.  You need to follow your pie dough’s directions.  If you are a superstar and you have made your own pie dough…..Wow.


These ended up so good!  They look like little smiles;)  They taste like a little bite of heaven.  Something about the sharpness of the cheese goes so well with sweet apples and buttery pie crust.  And these were so quick and easy to make!  You should totally make these for whatever kind of 4th of July celebration you are having.  Seriously.


Mmmmmmm….pie.

Lastly, I wanted to quickly show you a really fun and easy idea that your kids would love for the 4th.  Kids love ice cream, right?  And kids love candy, am I right?  I combined the two and made the cutest ice cream cones!  The best part is…..you can make the cones the day before, so all you have to do on the 4th is scoop ice cream.


I melted white chocolate chips and dipped my cones in the melty deliciousness.  Then, I rolled each cone in pop rocks and sprinkles.


I topped each ice cream scoop with more candy.  It’s patriotic yumminess!


Addy and her purple stained hands thought it rocked.

And yes, she did sweep her hair to the side before I took the picture.  She is 7 going on 15.

Have a great weekend!!

Tuesday, June 26, 2012

Easy 4th of July!


Hi guys!  If you have looked at my Facebook page, then you know that tonight I am going to be at Real Deals “Designing Divas” event.  I will be selling Gourmet Rooster and giving out advice on 4th of July entertaining.  I am also providing some yummy and easy appetizers and desserts.  I will have recipe ideas that are super simple for the 4th too.  Nobody wants to spend their 4th of July inside cooking, whether or not you are hosting…….I think that my sauces and spreads can help you jazz up some really easy recipes so that you look like a cooking bad-ass.  Nobody will know you used canned this, or pre-packaged that.  They will just think that you are awesome.

Today I am going to share with you two of the ideas that I am featuring tonight.  I am going to show you how to use my County Fair Peach spread to make a yummy sausage topping, and I will use my Whiskey Apple spread to make a delicious baked beans recipe.  Let’s start with the sausage topping because it is super quick and easy.


All I use is a jar of County Fair Peach spread, Dijon mustard, salt and pepper.  See?  Literally….the easiest recipe ever. 

I think that mustard and peaches go so well together, and I have always been a fan of fruity mustards.  I think that these two things together make the best topping for sausage of any sort……kielbasa, smoked sausage, brats, etc. 


The ratio for the fruit spread to mustard is 2:1.  So it doesn’t matter how much you want to make, just double your fruit spread to mustard.


I also add a smidge of salt and pepper.


I put my peachy mustard over grilled smoked sausages.  Tonight I will be serving it with little bites of smoked sausage.  I think this will be a fantastic appetizer.  Are you on tap to bring an appetizer to a 4th festivity?


Yum!  Of course, you have to like mustard to enjoy this, but I think the sweet flavors of peach mix so well with the sharp tang of mustard.  This is a new and exciting topping for your typical sausage.  You d0on’t have to tell anyone how easy it was.

Next, I will share with you an easy recipe for baked beans that features my Whiskey Apple spread.  Again, this is sweet and savory flavors mixed together, but I love the sweet apples with smoky bacon and beans.  I have done a version of baked beans that is super similar to this, but it is so good it could stand a repeat…in any variation.


For these beans, I used 2 tall cans of plain baked beans, onion, bacon, garlic, and Whiskey Apple Spread.  If you are wondering what that squirty bottle is…..When I sample my products at Farmer’s Markets, I have to have an easy way to get the product to people….hence the squirt bottle.  This was leftover from last week.


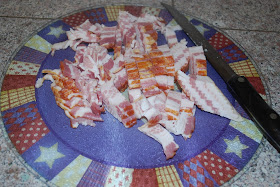
I started by chopping about ½ a pound of bacon.  I don’t care how sharp your knife is…..chopping raw bacon sucks.  Muddle through….it’s worth it.


I cooked the bacon until it was browned.  Then, I removed it from the pan with a slotted spoon.  I left about 2 tablespoons of bacon grease and dumped the rest.

Ok, I didn’t dump it.  I saved it in a dish.  That will come in handy sometime;)


I added my onions and garlic to the bacon grease.  At this point, you can add some pepper if you want.  You can also add a smidge of salt, but remember….bacon is super salty.

I cooked the onions until they were softened….just a few minutes.


Next, I stirred in my Whiskey Apple spread.  It will coat all the onions and stay pretty thick.


I stirred in my two cans of beans and poured the whole mixture into a baking dish.


And whoops….I forgot the bacon, so I added that back in to the beans in the baking dish.  This will bake at 425 degrees until it is heated through and bubbly on top.  Baking it in the oven gives it a chance to thicken.


Yum!  Baked beans are essential for the 4th of July, I think.  This recipe is still super easy, but it doesn’t taste like a can o’ beans.  It is sweet, smoky and crazy good.  If you can’t find my Whiskey Apple spread, feel free to use any kind of apple butter that your store has.  But it won’t be as good;)

I hope to see some of you tonight!  I will be the one by the food.

County Fair Peach Mustard

1 cup Gourmet Rooster County Fair Peach Spread

½ cup Dijon mustard

¼ teaspoon salt

¼ teaspoon black pepper

Mix all ingredients together.  Store in refrigerator.


Whiskey Apple Baked Beans

½ lb. bacon, chopped

1 cup white onion, chopped

2 cloves garlic, minced

½ teaspoon black pepper

1 cup Gourmet Rooster Whiskey Apple Spread

2-28 ounce cans baked beans


Preheat oven to 425 degrees.

In a large skillet, brown bacon over medium high heat, about 5 minutes.  Remove bacon with slotted spoon, leaving about 2 tablespoons of bacon drippings in the pan.

Sauté onion and garlic in bacon drippings, over medium high heat.  Season with pepper.  Cook until onions are softened, about 4-5 minutes.  Add Whiskey Apple Spread and beans.  Mix well.  Stir in reserved bacon.

Pour beans into baking dish and heat until hot and bubbly, about 15 minutes.

Serves 8-10


Friday, June 22, 2012

Ice Cream Sandwiches!


Hi guys!  Sorry this is late.  My Thursdays are pretty much all about Farmer’s Markets now.  I’m not complaining though.  So far they have been super fun.  We have met the best people, and I always love to sample my products for people.  I want to have all of America drinking the Gourmet Rooster Kool-Aid;)

Last night wasn’t quite as fun though….I have had a horrid sore throat for the past few days, so talking was hard.  My medical friend Charlotte diagnosed me with tonsillitis and gave me a shot of antibiotics in my behind.  I literally couldn’t swallow anything.  Every time I tried to eat if felt like I was swallowing shards of glass.  All I could eat was ice cream.  Which really isn’t the worst thing…..

Since I was on an ice cream only diet, I decided to bust out my trusty ice cream maker.  I already had a great recipe for homemade vanilla ice cream, but this time I stirred in Gourmet Rooster County Fair Peach Spread and ended up with the most delicious ice cream.  I made ice cream sandwiches for the kids, and I just ate a bucket of ice cream.  I will show you how I made it!


This ice cream starts out with a cooked custard base.  Don’t get scared….it is still really easy.  I used whole milk, heavy cream, sugar, egg yolks, vanilla extract and County Fair Peach Spread.

I have got to figure out how to get rid of the glare from the flash of my camera.  Until I figure that out….I do apologize for my unsightly photos;)


I started by whisking my egg yolks and vanilla into sugar.  I whisked for a while….until the mixture was slightly thick and pale yellow.


Like so.


Then I heated my milk to a simmer on the stove.  I am still figuring out the whole gas stove thing.  I have never had one before.  I love it, but adjusting the temperature is hard.  It’s touchy.  I can understand….I am too. 


Once the milk was at a simmer, and you will know this because there will be bubbles along the side, I slowly added about a cups worth to the egg mixture….whisking all the while.  This is called “tempering”.  It just means that I am bringing the eggs mixture closer to the temperature of the milk.  If I just stirred the egg mixture right into the milk I would have one helluva pot of scrambled eggs.  Sweet scrambled eggs, so that would be gross.

Once the egg mixture was heated a bit, I poured it slowly into the milk pot.  And yes, I whisked the whole time.


Me…..whisking.

I let this cook until the mixture thickened, about 5 minutes.  If you think you are getting curdled egg, turn down your heat.


Once my mixture was thick, I poured it into a large bowl that already contained my heavy cream.  I stirred it up and added my peach spread.

If you think your eggs curdled a bit, feel free to push the milk mixture through a fine sieve before you add it to the cream.  I can’t think of anything grosser then chunks of egg in your ice cream.  Well, I can….but I won’t go there.


This all got poured into the base of my ice cream maker and then I plugged that bad boy in and let it rip. 

If you don’t have an ice cream maker, you must get one.  They aren’t that expensive and they are so fun!  You can make ice cream, obviously, but you can also make fro-yo, slushies, sherbet, etc.  My kids love it.

I let this run for about 30 minutes.

Once it was frozen, I transferred the ice cream to a 13x9 pan and popped it in the freezer to freeze all the way through.  My ice cream maker likes to keep everything at soft serve consistency, which is delicious but no bueno for ice cream sandwiches.

While my ice cream froze, I made snickerdoodles to use as my “bread” for my sandwiches.  I used a packaged mix.  I won’t show you because I think we can all make cookies from a mix.  I bet even Mr. Rooster can, and he can barely boil water.


Once my ice cream was hard and my cookies were cooled, I used a round cookie cutter to poke out my ice cream.  I chose a cookie cutter that was slightly smaller than my cookies.  This way the ice cream had a little “squish” room when I assembled my sandwiches.


Yum!  The peach ice cream is sweet and tastes like peach pie.  The cookies are the perfect complement too. 


I ate most of the ice cream…..I can’t help it!  It soothes my throat;)  But it is so creamy and delicious, I probably would have eaten it all anyway.  I hope that you will try this recipe if you have an ice cream maker.  If you don’t…go get yourself one!


County Fair Peach Ice Cream

1 Tablespoon vanilla extract

6 egg yolks

¾ cup sugar

2 cups whole milk

2 cups heavy cream

9 ounces County Fair Peach Spread

Whisk together egg yolks, sugar and vanilla extract until mixture is thickened and pale yellow.  Set aside.

Bring milk to a simmer over medium heat, stirring occasionally.  Once milk is hot, slowly add about a cup of milk into egg mixture, whisking the whole time.

Pour heated egg mixture into milk and heat over medium heat, whisking frequently.  After about 5 minutes, the mixture will thicken and coat the back of a spoon.

Pour milk and egg mixture into a bowl containing heavy cream.  Mix well.  Stir in peach spread.

Pour ice cream mixture into ice cream maker.  Follow ice cream maker directions.

Tuesday, June 19, 2012

Huli Huli Tacos!


Hi guys!  Long time, no talk!  I took last week off because we moved.  We are all settled in now.  I still have a few boxes in my room left to unpack, but we are pretty much “in” for the most part.  This move reminded me how much I hate moving.  I will live in this house until the day I die.  I don’t care what I have to do to stay here….I will make it happen.  Moving is a nightmare.

Enough bitching….onto the food;)

Think I have talked about this before, but Reno has a pretty good street food scene going on here lately.  Of course, my favorite food truck is Gourmelt.  And not just because they are using my Smoky Chipotle BBQ sauce in their special sandwich of the week this week, but because….it is a truck that serves all grilled cheeses.  Hello…..it doesn’t get any better than that!  The owners are also super cool.  But there is another truck here that I have been fascinated with.  It is called “Kenji’s” and they serve Asian/Mexican fusion as well as some Hawaiian food.

The first time I heard about this truck, I was super excited to go.  Then I checked their Facebook page and found out that they basically only serve in downtown when the bars were closing.  I thought “Perfect!  I will go the next time I am out getting my drink on downtown.”  And then I remembered that I have never done that.  I have never been to the bars in downtown Reno.  I don’t even know what constitutes a cool bar.    And I especially wouldn’t be awake at 2 in the morning.  So I resigned myself to the fact that I would never get to enjoy Kenji’s.  But then…..they showed up at the Spark’s Farmer’s Market.  I got to try their Asian tacos….and I was in love.

Their Asian tacos are grilled chicken or steak that has been marinated in Asian flavors. They serve the tacos on corn tortillas, like a street taco.  They are topped with cilantro, chopped white onion and the most delicious pickle-like cucumber.

I realized that I could pretty easily do this at home.  This will save me the trouble of stalking them at 2am.  I’m not trying to say that I am as cool as them, or my Asian tacos are better….I’m just trying to say that nobody wants this 35 year old downtown at 2am.

I call my Asian tacos Huli Huli Tacos.  You will see why.  They were frickin’ amazing.  Maybe I will get my own food truck.  I will show up at Little League games and elementary schools at pick-up time so moms like me can enjoy a good Asian taco.


I started with chicken thighs, thin cut rib-eye and a bottle of Huli Huli sauce.  Huli Huli sauce is a Hawaiian specialty.  It is basically their BBQ sauce.  It is like soy sauce, but sweeter and it has ginger in it.  It is delicious.  I got my bottle at Cost Plus, but it is pretty easy to find.  I prefer it to regular soy sauce.

If you absolutely can’t find it….use a mix of soy sauce and teriyaki sauce.


I marinated my chicken and steak in Huli Huli sauce overnight.  I rubbed it around every once in a while to make sure it was sinking in.  I really let these bad boys marinate along time.


A couple of hours before I was ready to grill my meats, I made my version of the cucumbers that Kenji’s uses on their tacos.  I may be a complete copy cat, but I keep telling myself that imitation is the sincerest form of flattery.

I used cucumbers, brown sugar, Huli Huli sauce, rice vinegar, Sriracha hot sauce, garlic, and sesame oil.


I mixed together all the ingredients but the cucumbers.  It won’t seem like much liquid for the amount of cucumber, but remember….as they soak, the salt in the Huli Huli sauce will pull out a lot of moisture.  In fact, there will be so much liquid...you will need a slotted spoon to pull the finished product out.


Toss in your diced up cucumbers and cover this with plastic wrap.  Let the bowl sit in your fridge for a couple of hours.  The cucumbers will soak up all the goodness and become sort of an Asian pickle.


After the chicken has marinated for a super long time….toss it on the grill.  I used my indoor grill because I haven’t managed to find my charcoal yet.  I am pretty sure it got thrown away…..

I grilled it until it was cooked through.  These pieces are pretty small and flat so it went quickly.  About 4 to 5 minutes a side.


I also grilled my steak, about 3 to 4 minutes a side because it was super thin.

Then, I chopped up all the meat into tiny pieces.  Not minced or anything, but smaller than bite sized.


The last step before I assembled my tacos was to make a sauce to drizzle over the tacos.  I used mayonnaise, white sugar and Sriracha hot sauce.


I stirred the 3 ingredients together and poured it into a squirty bottle.  If you don’t have one, don’t sweat it.  You can drizzle the sauce over with a spoon.


I used white corn tortillas.  I used 2 per taco.  I tossed mine on my gas grill to get them a little more pliable.  I set them directly on the burner and cooked both sides for less than a minute.  If you don’t have a gas grill, throw the tortillas on your BBQ if you are outdoor grilling.

Assembly time….


For my chicken taco, I layered the diced chicken, chopped white onion, chopped cilantro, my “pickles” and my special spicy sauce.


Same for my steak taco.


Holy crap…these were so good!  The meat is salty, sweet and so crazy good.  But the best part is the cucumbers mixed with the yummy special sauce. The “pickles” are sweet, salty and spicy.  So, so good.   I don’t want to brag….but Chris ate 8.  And not just because he is freakishly large.  But because they were that good.


Watch out Kenji’s.  I don’t need you and your 2 am truck;)

Huli Huli Tacos

½ pound chicken thighs, boneless and skinless

½ pound thin cut rib-eye, or your favorite cut

1 ½ cups Huli Huli sauce

24 white corn tortillas

½ cup cilantro, chopped

¾ cup white onion, chopped

Special sauce-recipe to follow

Asian “pickles”-recipe to follow

Place chicken and steak in its own re-sealable plastic bag.  Divide Huli Huli sauce equally.  Place meats in fridge and let marinate for at least 8 hours.

Remove meat from marinade and pat dry.  Grill chicken on BBQ, about 4-5 minutes per side.  Let rest.  Grill steak on BBQ, about 3-4 minutes per side.  Let rest. 

Once meats have rested, chop into bite sized pieces.

Warm tortillas on grill to make them pliable.  Place 2 tortillas on plate, right on top of each other.  Layer meat, chopped onion, chopped cilantro, “pickles”, and special sauce. 

Makes 12 tacos

Asian “Pickles”

1 large cucumber, diced

½ cup Huli Huli Sauce

2 tablespoons brown sugar

1 tablespoon rice vinegar

1 teaspoon garlic, minced

1 teaspoon sesame oil

2 dashes Sriracha Hot Sauce

Mix together all ingredients except for cucumbers.  Pour mixture over chopped cucumber.  Cover with plastic wrap and chill for at least 2 hours.

Special Sauce

½ cup mayonnaise

1 tablespoon white sugar

1 to 2 teaspoons Sriracha Hot Sauce

Mix together all ingredients.  Chill until ready to use.

Tuesday, June 5, 2012

"Top Secret" Gourmet Rooster


Hi guys!  I have something huge for you today.  I am giving you a “top secret” Gourmet Rooster recipe.  This is the recipe that started it all…..Sundried Tomato Jam, and it is ,by far, my favorite.  This is the recipe that got the ball rolling and made me decide to go into business.  Why don’t I carry it at Gourmet Rooster?  Well…..some recipes just don’t make it to market.  That was the case with this.  It has a long cook time, expensive-ish ingredients, and it just didn’t go from a small amount to a commercial amount well.  But….it remains my favorite, and I decided it was high time I shared it with you.  It is so good that I just can’t leave it for only me.

This is a pretty easy recipe to make.  It takes a bit of time, but it is so worth it.  Let me show you how I do it….


I start by roasting a whole head of garlic.  I just cut the top off and lay the whole thing down on foil.  I drizzled it with olive oil and sprinkled it with salt and pepper.  Then, I made a tight bundle and popped it in the oven for 30 minutes on 400 degrees.

Meanwhile….


I also used olive oil, a whole onion, chicken broth, sundried tomatoes packed in oil, red wine vinegar, brown sugar, white sugar and some water that didn’t quite make the picture.

I chose the tomatoes packed in oil because I think they have a better flavor and texture.  This, my friends, is what made this recipe too expensive to bring to market.


I start the recipe by cooking the onions in a bit of olive oil for about 15 minutes.  The onions will have just started to caramelize.  Once they do, I throw in the sundried tomatoes, which have been drained, and the roasted garlic.  The garlic will squeeze right out of the carcass like a paste once it is cooked.

If your sundried tomatoes are in huge pieces, chop them up a bit.  This will become a “jam” at the end and smaller pieces are better.


Once the garlic and tomatoes had been stirred in, I added the broth, vinegar, water, white sugar and brown sugar.  I also added a smidge more salt and pepper.  That is totally to your taste. 

This mixture gets brought to a boil, covered, and cooked for 30 minutes over medium heat.  Go about your business…watch TV, take a nap, go for a walk, look on Pinterest, etc.


That is my jam…boiling.
Actually, that isn't "my jam".  My jam is Push-It by Salt & Pepa;)

Once it has simmered for a full 30 minutes, take off the lid and continue cooking the jam until it is jam-like….about 15 minutes.  Stir frequently.  You will be surprised how quickly this goes from a soupy concoction to jam.  The sugars caramelize and everything reduces and gets nice and sticky.


My absolute favorite way to eat this jam is on toasted baguette slices with goat cheese.  I sliced my baguette and threw it in the oven to brown up.


I spread goat cheese on the toasted slices.  I love cheese.  Have I mentioned that? 


Then, I top the goat cheese with my yummy jam.  This jam is sweet and savory at the same time.  You can taste the sweetness of the onions, the saltiness of the tomatoes, the tang of the vinegar, etc.  It is perfection in one bite.


This jam is great on sandwiches, chicken breast, steak, fish, or just straight out of the jar.  I wish I could carry this and sell it to all of you, but I will have to just imagine that you are all making it at home and loving it;)

Roasted Garlic and Sun-Dried Tomato Jam

1 Head of Garlic, roasted

2 T. Olive Oil

1 Small Onion, (about 8 oz.), thinly sliced

8 oz. Chopped Sun-Tomatoes in oil, drained

2 T. White Sugar

2 T. Brown Sugar

¼ Cup Red Wine Vinegar

1 Cup Water

½ Cup Chicken Broth

½ tsp. Salt


To roast garlic:

Cut about ¼ inch off the top of the head, to reveal cloves inside.  Drizzle with 1 T. of olive oil and wrap in foil.  Roast at 400 degrees for about 30 minutes.  Unwrap foil and let cool.


Sauté (on medium-high) onion in remaining olive oil until they start to caramelize, about 15 minutes.  Squeeze in roasted garlic and add tomatoes.  Mix well.  Add remaining ingredients and mix well.  Bring to a boil, reduce heat, cover and simmer for 30 minutes.  Remove cover and simmer until jam-like, about 15 to 20 minutes.