Tuesday, May 31, 2011

I Win The Eating Contest!

Good morning!  We had a great weekend.  My mom was up visiting for the whole weekend, and I kind of feel like we had a giant food fest.  Seriously….It was as if I entered an eating contest and placed first.  I might try to get a spot on the Biggest Loser Ranch for next season…that is how much we ate.  We had a great time though.  I was sorry to see her goL
I have to make this quick today because today is the day that my baby gets her tooth pulled….a la Shiloh Pitt.  Yep, my 3 year old has to get a tooth pulled and won’t have a front tooth until her permanent tooth grows in.  She is excited for the Tooth Fairy to come….she has no idea that getting a tooth pulled involves a shot and perhaps some pain.  And oh yeah…numbness.  So needless to say I am super excited for this all to happen.  Should be a fantastic day.  Really top notch.  You all could read my sarcasm there, right?
So back to the food….one of the really yummy things we ate while my mom was here, as she loves desserts, was a Honey-Banana-Peanut Butter Cheesecake.  I have always liked peanut butter, honey and banana sandwiches.  Soooooo, I figured it would be good in a cheesecake.  But honestly, what wouldn’t be amazing in cheesecake form??  The idea for the cheesecake just came to me one night while I was lying in bed.  Yep, most of my best recipes come to me in the middle of the night.  Weird, right?
This is a baked cheesecake, not one the sets up in the fridge.  I like this kind best.  It tastes more real to me….if that makes sense.
I want to start by showing you the crust.  I decided to change it up a bit and use Nilla Wafers for the crust as opposed to graham crackers.  I feel like they have a more subtle flavor.  I don’t want anything to get in the way of the flavors of the actual cheesecake.
I used Nilla Wafers, butter and a very small amount of sugar.  If you are feeling particularly adventurous, I bet Nutter Butters would be an amazing substitution.
I put Nilla Wafers into my food processor with 3 tablespoons of melted butter and 1 tablespoon of white sugar.  You want to end up with about 1 cup of crumbs…..
You only need to pulse this in the processor a few times…..Just until you see the crumbs start to clump together a bit.
I pressed the mixture into a 9 inch spring form pan.  I just covered the bottom of the pan.  I didn’t go up the sides at all.  A good trick is to use the bottom of a measuring cup to help press down the crust.  This crust doesn’t get pre-baked.
The filling for this cheesecake is lots of softened cream cheese (four 8 ounce packs), sugar, vanilla extract, sour cream, peanut butter and eggs.  We will get to the topping later.
This is so easy to make.  I beat together all of the filling ingredients, except for the eggs.  This is thick!  It will make your beaters work….but better your beaters then you, right?  That was a tongue twister….say it 5 times fast.

Once the mixture is smooth, I added the eggs, one at a time.  Stop lookin’ at the picture!  The eggs came out too fast;)
Once all the eggs are beat in, I poured the mixture over the crust.  This bakes at 325 for almost an hour.  The top will probably crack….which ain’t no thang.  It gets a topping, so really….who cares?
Once the cheesecake is baked, it will need to chill for AT LEAST 4 hours.  Or overnight.  While the cake chills, you can make the topping.
The topping is butter, honey and under ripe bananas.  If they are too ripe, they will just turn to mush when you cook them.  Gross.
I sliced the bananas, about a 1/3 of an inch thick.  And peeled them, but you assumed that, right?
I melted about 3 tablespoons of butter in a large sauté pan.  Then, I added the bananas.  I only cooked them until they browned a bit.  I don’t want to turn them into mush…..I want to caramelize them.  The honey will help with that.  You can add that once the bananas have browned a bit on one side.
Once the cheesecake is chilled, the topping gets poured right over the top.  Do you see the honey running down the side?  Yum!!
This cheesecake was Ah-May-Zing.  So, so good.  The peanut butter goes so well with honey and bananas.  But….if you absolutely don’t like bananas, you could make a chocolate ganache for the top.  If you like bananas, but not honey, you could use brown sugar instead.  And rum!....like bananas foster…..Any way you make this, I promise….you will love it.  It is light and fluffy, but still rich and creamy.  It is cheesecake perfection!
Now I am off to the dentist.  Wish us luck!!!
Peanut Butter Cheesecake with Honeyed Bananas
Crust:
1 cup Nilla Wafer crumbs
3 tablespoons butter, melted
1 tablespoon sugar
Filling:
32 ounces cream cheese, softened
1 cup sugar
1 tablespoon vanilla extract
½ cup sour cream
¾ cup peanut butter
4 eggs
Topping:
4 to 5 under ripe bananas, sliced
3 tablespoons butter
¾ cup honey
Preheat oven to 325 degrees.
Mix Nilla Wafer crumbs with melted butter and 1 tablespoon sugar.  Press into the bottom of a 9 inch spring form pan.
In a large bowl, beat together (with a hand mixer) cream cheese, sugar, vanilla, sour cream and peanut butter until smooth.  Beat in eggs, one at a time.  Pour over crust and bake at 325 degrees for 55 minutes, or until middle is set.
Chill cheesecake in the refrigerator for at least 4 hours.
For the topping:
In a large sauté pan, melt butter.  Add sliced bananas.  Sauté, over high heat, until bananas start to caramelize, about 4 minutes.  Add honey and heat though.  Pour over chilled cheesecake.

Thursday, May 26, 2011

Easy Appetizers for Memorial Day!!

Good morning!  Happy almost Memorial Day Weekend!  I am very excited for a three day weekend!  Plus, my mom is coming to visit…..Yeah!!!  Remember what I said on Tuesday….I love having people stay with me.  Hopefully we get some nicer weather while she is here…..my mama is not a fan of snow, cold, rain, etc….
I asked a few days ago what everyone wanted to see in terms of Memorial Day recipes.  Apps won….which makes me so very happy.  There is nothing I like better than creating new appetizer recipes.  I had a few in the hopper too.  I am co- hosting a baby shower next weekend, so I had already started with the app thing.  The recipes I created will work for your Memorial Day BBQ’s too!  I will show you how to make them….easiest to hardest.  And trust me, even the hardest isn’t that hard…..
My first appetizer is more of an idea then a recipe.  Have you all ever had chicken and waffles?  It is kind of a soul food thing.  There is a chain of restaurants called Roscoe’s House of Chicken and Waffles that started in Harlem and spread across the country to LA.  They specialize in (duh) chicken and waffles. 
This chicken and waffle appetizer is probably the easiest thing you could make for a party….If you are short on time, energy, kitchen space, etc…..this is for you. 
I use frozen mini waffles, frozen popcorn chicken, and honey.  Aren’t they adorable?
I toasted the waffles in the oven at the same time the chicken cooked.  Then, I set them up on a platter and drizzled honey over them.  I know that chicken and waffles might sound weird to some of you….but you have to give it a shot.  Waffles aren’t sweet, so it isn’t like I am pairing chicken with a sugar cookie or something;)  This is the perfect little hand held app, and it is different.  I guarantee you that your guests won’t have seen this before.  And really, the only energy it takes is turning on the oven.
My next appetizer is BBQ chicken cups.  I used a box of cornbread mix, a rotisserie chicken, Gourmet Rooster BBQ sauce, shredded cheese and green onions.
I prepared the cornbread mix according to the package instructions, but I also stirred shredded cheese (about 3/4 of a cup) into the batter.  I baked the muffins in a mini muffin tin that had been sprayed with cooking spray.
As soon as the muffins came out of the oven, I used the end of a wooden spoon to poke a hole in the middle.  I suppose you could use your finger too, but these babies are hot!

Then, I took chicken off of the bone from my rotisserie chicken and cut it into pretty small pieces.  I mixed the chicken with BBQ sauce and microwaved it until it was warm.  I filled each little hole in the mini muffins with chicken.  I topped the whole thing with green onions……
Another perfect little hand-held treat!  You could use leftover chicken or even the BBQ chicken that comes sauced that you get in the meat section of your grocery store

Cornbread goes so well with BBQ.  This really would be the perfect appetizer for a cook-out/BBQ.
My third appetizer is a dip…..a buffalo chicken dip!  I have a friend that loves hot wings, so I created this for him.  I am not such a fan.  I like the flavor of them, but they are so hard to eat.  Plus, they turn your hands and face a greasy orange.  And then there are the bones to contend with.  Not fun.
I have seen a lot of recipes for buffalo wing dips, but mine is the easiest you will find.  Plus, it is filled with blue cheese which really is the best part anyway.
For the dip, I use chicken (from a rotisserie chicken), blue cheese, mayonnaise, cream cheese, hot wing sauce, Worcestershire sauce, and salt and pepper.
With a hand mixer, beat together the softened cream cheese, mayo, blue cheese, Worcestershire and salt & pepper.  Just beat it until everything is combined.  I don’t beat it until smooth, as I like the blue cheese to be chunky.  I spread this in to the bottom of a baking dish, like one the size of a pie plate.
Then, I mix the chicken with some hot wing sauce.  I used a “thick” one so that my chicken mixture won’t be runny.  I spread the chicken on top of the cheese mixture, leaving a border all the way around.
I sprinkled the chicken with a little bit of reserved blue cheese and popped this bad boy under the broiler.  I broiled it for a few minutes, just until the top was bubbly and starting to brown.

Just like Buffalo wings, I served this with celery….and sliced, toasted baguette slices….which is not just like Buffalo wings;)  My husband devoured this.  Like seriously went nuts on it.  I think I got maybe one bite.  It was a hit, for sure.
This has all the best parts of wings, but minus the bones and mess.  Plus, it was still super easy! 
(Come on Court-get a manicure!)
My last appetizer, and the one that requires the most work, is “shrimp and grits”.  When I say “work”, I don’t mean this is ridiculously hard, I just mean it is the hardest of the four……but so worth the effort.
Shrimp and grits is a very southern thing….South Carolina and Georgia to be exact.  It consists of shrimp cooked with bacon, green onion, sometimes garlic and cheese.  And that is all served over grits that have been made with cream, butter and cheese.  Sounds good, right?  I love shrimp and grits, so I desperately wanted to turn it into an appetizer.
To make this more of a finger food, I used polenta instead of grits.  It all comes from corn anyway;)  I bought a tube of polenta…the kind you can slice.  I sliced mine about 1/3 of an inch thick.  Make sure you dry your slices really well.  Lay them on a clean towel for at least 10 minutes.  If they are too wet, they will not brown well.  Plus, when you put something wet into hot oil, it will splatter further then you ever thought possible.  Like you will find oil spots in the next room…..
I put my polenta slices into a sauté pan that had about 4 tablespoons of vegetable oil in the bottom.  I cooked these for a few minutes each side, or until they browned a bit.  I set them on paper towels to drain once I took them out.  You will have to fry these in batches, unless you have the world’s largest frying pan.
For the topping, I fried a few pieces of bacon in a hot pan.  Once the bacon was cooked, I took it out and drained it on paper towels, but I left most of the bacon drippings in the pan.  The shrimp cooks in the bacon drippings which automatically makes it good;)

I sautéed the shrimp with 2 cloves of minced garlic.  Once the shrimp was cooked, I added the crumbled bacon back in and some green onions.
I topped each polenta slice with some shredded cheese and then the shrimp.  OMG-these are amazing.  Yes, they take a tad more work than the other apps, but they are heaven on polenta.  You have to try these.  If you like shrimp, you will LOVE this.
I hope that you try one of these recipes/ideas for your Memorial Day parties.  And I also hope you have a fun and safe Memorial Day!
I will pop back in tomorrow with a quick cocktail idea……

Chris’s Favorite Hot Wing Dip
6 ounces cream cheese, softened
1 cup mayonnaise
5 ounces crumbled blue cheese
1 tablespoon Worcestershire sauce
½ teaspoon each salt and pepper
2 cups shredded chicken
½ to ¾ cup “thick” hot wing sauce
Pre-heat broiler.
In in mixing bowl, combine cream cheese, mayo, blue cheese (reserving about 1 ounce), Worcestershire and salt & pepper.  With a hand mixer, beat until combined.  Spread mixture into a baking dish.
In a separate bowl, combine chicken and hot wing sauce.  Top cheese mixture with chicken.  Sprinkle reserved blue cheese over the top and broil until dip is bubbly and starting to brown, about 4 minutes.
Serve with toasted baguette slices and celery.

Court’s Shrimp and “Grits”
1 tube polenta
2 cloves garlic, minced
2 cups raw shrimp, shell and tail off
6 slices bacon
½ cup green onion, diced
1 cup shredded cheddar cheese
Oil frying polenta
Slice polenta into ½ of an inch thick slices.  Dry well.  In a large sauté pan, fry slices in oil until browned on each side, about 4 minutes per side.  Remove from pan and drain well.
In a sauté pan, fry bacon until crisp.  Remove from pan, but leave drippings.  Drain bacon well and crumble.
In bacon drippings, sauté shrimp and minced garlic until shrimp is cooked through, about 4 minutes.  Add green onions and reserved bacon.
Top each polenta slice with shredded cheese and shrimp mixture.

Tuesday, May 24, 2011

It's breakfast-Ole!

Hi everybody!  I know, I know…..this is late.  I had a busy day.  My little Paisley had to go to the dentist.  Turns out she hit one of her front teeth on something, at some point, and the tooth is now dead.  And has an abscess……So she has to get the tooth pulled next week.  Yep, my 3 year old will be sans a front tooth.  The dentist could put a fake one in, but really, what would be the point. She will lose that tooth in about 2 years anyway.  There goes all my corn on the cob and rib recipes that I wanted to try out on her……
Not that you would know it from the weather, but summer is approaching.  And summer means house guests, right?  I know it does for me because I live super close to Lake Tahoe.  Plus, I LOVE having people stay with me.  More people to feed and that makes me happy.  I have been trying out new recipes that feed a crowd, and I want to share my new favorite with you.  Breakfast Enchiladas!  They are amazing, and the best part is….they can be made the night before, and baked the morning you need them. 
I like to fatten everyone up before I send them out to the lake.  That way, they don’t look that much better than me in a bathing suit…..So yeah, if you are coming to visit me….be warned.  There will be no light or fat-free here.
Let’s start with the filling…..
I use beef chorizo, “southern hash brown” potatoes (from the freezer section), a small onion, eggs and butter.  I prefer beef chorizo over pork.  Do me a favor….don’t read the label.  Just trust in me that chorizo is delicious.  If you must use something else, use ground pork sausage, but you won’t get the spicy yumminess that is chorizo.
Also, make sure you use Mexican chorizo.  It is a ground sausage that you wouldn’t be able to cut.  It squeezes out of the package.  Spanish chorizo is sliceable (is that word?) and that wouldn’t work as well here.
I start by browning the chorizo with a small, diced onion.  If you have never cooked chorizo before….be forewarned.  It will look like it is the greasiest, messiest stuff ever.  It isn’t.  It will dry up.  In fact, that is how you know it is done.  It will dry out and look crumbly.  This will take about 5 to 8 minutes.
You can see in the picture above that this chorizo isn’t quite done.  All of that orange greasy stuff will go away.  When it is done, remove the chorizo and onion from the pan, but leave some of the drippings that did stay.
Next, you add your potatoes to the same pan….still frozen.  These will fry in the chorizo fat.  You might need an extra tablespoon or two of butter.  These will fry for about 10 minutes….until they are brown and crunchy.
While the taters are cookin’, you can get started on your scrambled eggs.  These are not fancy in any way, shape or form.  I don’t add anything, even salt and pepper.  The chorizo adds enough spice.
I throw the eggs in a pan with a tablespoon of butter and scramble them.  You know how to do that, right?
Once the potatoes are crunchy, I stir back in the chorizo and onion mixture.  In Mexico, Chorizo con Papas is a very popular breakfast taco filling.  (that means chorizo and potatoes)  Do you see how authentic I am?  Don’t worry, I will blow that in a bit when you see what kind of tortillas I am using……
Before we fill these enchiladas, let me show you what else I use for this recipe.  I use flour tortillas, shredded Mexican cheese, red enchilada sauce, salsa and Mexican crema.
Yes, I use flour tortillas.  I know that corn would be the preferred tortilla for enchiladas, but let me state my case.  Number one, I don’t really like corn tortillas.  Number two, they break when making enchiladas unless you fry them slightly.  I don’t want to take that extra step, so I break tradition and use flour.  I apologize in advance to anyone I am offending;)
I like to use a mix of salsa and enchilada sauce because I like the texture that salsa gives to this.  You could use all enchilada sauce, or all salsa, or a combo like me.
And finally, I use Mexican crema because it has a pourable consistency.  It also isn’t as tangy as sour cream.  You could, of course, sub in sour cream.
I like to pour a bit of salsa and enchilada sauce into the bottom of the baking dish that I will be using.  This keeps the enchiladas from sticking.

I fill my enchiladas pretty full.  Remember, I am using flour tortillas!  They won’t break;)  I roll them up and place them, seam down, in the baking dish.
I keep filling, rolling and cramming in until my pan is full.
I cover the whole thing in my enchilada sauce/salsa combo.  I also pour on some crema.  This will make these creamy and delicious.  And yes mom, you can omit this step.
The whole thing gets covered in cheese.  I used Kraft’s new Mexican cheese that has a touch of cream cheese in it.  Seriously….I am pretty sure anything would be better with a touch of cream cheese in it.
At this point, you can cover the whole thing in foil and refrigerate overnight.  The next morning, you take it out of the fridge while the oven pre-heats.  This will cook for about 30 minutes covered, and 30 minutes naked. 
These enchiladas come out gooey, cheesy and delicious.  I think that these make a perfect breakfast.  I can’t wait to have visitors just so I can make these! 
Who wouldn’t love these?  I feel very Ina Garten when I say that…..but seriously…..who wouldn’t?
I will be back on Thursday with some yummy Memorial Day appetizer recipes!!
Breakfast Enchiladas
9 ounces Mexican chorizo
1 small onion, diced
3 cups “southern diced hash brown potatoes”
3 tablespoons butter
12 eggs
28 ounce can red enchilada sauce
1 cup salsa
8 to 10 flour tortillas
2 cups shredded cheese
½ cup Mexican crema
Place chorizo and onion in a large sauté pan.  Sauté, over medium-high heat for about 8 minutes, or until chorizo is browned and most of the liquid has evaporated.  Remove from the pan, leaving about 2 tablespoons of fat in the pan.
Sauté potatoes in the reserved fat.  Add an additional 2 tablespoons of butter, if needed.  Sauté the potatoes for about 10 minutes, or until brown and crunchy.  Add chorizo mixture back into the pan and stir.
In a bowl, crack all 12 eggs.  Beat eggs with a whisk.  Pour eggs into a large sauté pan and scramble over medium heat until cooked.
In the bottom of a 13x9 baking dish, pour ½ cup enchilada sauce and ½ cup salsa. 
Fill tortillas with chorizo/potato mixture and eggs, about 3 tablespoons of each.  Roll and place in the pan, seam side down.  Roll and fill until pan is full.
Cover the entire pan with enchilada sauce and salsa, about 1 cup enchilada sauce and ½ cup salsa.  Top with crema and cheese.
Cover tightly with foil and chill overnight.
Bake at 350 degrees for 30 minutes, covered.  Remove foil and bake an additional 30 minutes, or until top is bubbly and starting to brown.

Thursday, May 19, 2011

I'm a Copycat...But in a Good Way

Shhhhhhh!!!!  Don’t tell anyone, but I’ve figured out how a few restaurants make their specialties;)  Yep, today is all about copycat recipes.  One thing you might not know about me is that I love to eat at restaurants.  I LOVE going out to eat.  I have since I was a kid.  We used to go out to eat every Friday night because my mom always said “the kitchen is closed” on Fridays nights.  I love getting to try new things, pick whatever I want, and I never have to clean up!  Yes, I love to cook…..most of the time.  But sometimes….mama needs a break.
When I was little, my mom usually picked where we were going to eat by what was in the Entertainment Book.  Now, I pick where we will go by what is “kid friendly”.  So we eat a lot of casual food.  I’m not spending my nights out at fancy places, by any means.  Today’s copycat recipes will reflect that.  I’m copying BJ’s, Red Lobster, Chevy’s and Boston Market.  Please don’t read this expecting me to copy Gary Danko or Boulevard. 
My first copycat recipe is my version of Cheddar Bay Biscuits from Red Lobster.  I have a strange obsession with Red Lobster.  I swear that part of the reason I moved to Reno is because they have a Red Lobster.  Apparently, I am not the only one, since every time I have been there is at least a 30 minute wait.  Anyhoo, I love their biscuits.  So I figured out how to make’em.
To make these little bites o’ heaven, I used Bisquick, cheddar cheese, cream, butter, garlic powder, dried chives and salt and pepper.  Keep in mind; I never said these were healthy.  They have a lot of butter and cream in them…..But I also am not serving them every night.  I don’t set them on the table as soon as everyone as seated as if I was actually Red Lobster.
I start by mixing the dry ingredients first…..Bisquick, salt, garlic powder and chives.  I chose dried chives as opposed to fresh because I am baking these.  I usually don’t cook fresh chives.  By using dried herbs, you can make these anytime because you probably already have all that you would need. 
Then, I start mixing in the melted butter, cream and cheese.  Super easy.  These are basically drop biscuits.
This is the dough once it is mixed.  It is super thick and sticky.  If you can’t get the cheese mixed in with a spoon, flour up your hands and dig in.  Wash your hands first;)
I drop these on a baking sheet with a mini ice cream scoop.  I have said it before and I will say it again….I feel like I can eat more if something is “mini”.  These are a quick bake.  I mean really, Red Lobster isn’t putting a whole lotta time into these.
These taste exactly like a Red Lobster Cheddar Bay biscuit, and I should know….I’ve had a lot.  In college, my roomie worked there, and she would always bring these home.  I kept asking for lobster tails….and she kept not bringing them.  Go figure;)
My next recipe is my version of Boston Market’s creamed spinach.  It really is odd for me to love this so much, seeing as I am not a veggie fan….but I think the huge amount of cream, cheese and butter works in my favor.  I think I would eat “creamed” anything.  That sounds dirty…..
I use frozen spinach that has been defrosted, garlic, cream cheese, butter, cream, asiago cheese and salt and pepper.  You could use fresh spinach, but you would need such a huge amount to equal what you get from one box of frozen spinach. 
I defrost the spinach in the microwave.  Then, I put it in a clean kitchen towel and squeeze all of the water out.  Then, I make my kids drink the spinach water because it is good for them.  I’m kidding….I don’t do that.  That would be weird.
In a large skillet, I met some butter with one clove of garlic.  I use my garlic press to mince the garlic, but obviously, a knife would work too.  I don’t brown the garlic; I just cook it for a minute or two.
Then I throw in some cream cheese and melt that a bit.  This would be a good opportunity to use Philly’s new Cooking Crème….but regular cream cheese works just fine.  And I actually used the 1/3 less fat kind;)  Yes, I did!  Sometimes I watch calories;)
I use cream to help make a sauce.  BTW-I am doing all of this over medium heat as cream cheese can burn easily instead of melting.
The final step to the sauce is to grate in some asiago cheese.  I happen to know that Boston Market uses asiago.  There is actually a sign on the window that says so.  But I don’t think anyone would blame you if you used parmesan.
The spinach gets stirred in and heated through …..and that’s it!  Creamed spinach.  Just like mama used to make….or someone’s mama at Boston Market.  Mrs. Market perhaps?
I try not to eat the whole thing…..but how can I not?  I need spinach to keep my Popeye guns!
Let’s move on to my third copycat recipe…..Chevy’s Sweet Corn Tamalito.  You know, the little sweet corn cake that is on your plate with anything you order at Chevy’s?  I love those little things.  Apart from the tortillas fresh of the maquina….these are the best thing at Chevy’s.
I use canned corn, canned cream corn, masa harina, room temperature butter, corn meal, baking powder, sugar, cream (yep-more cream), and salt.  You may also need some water.
I have seen other recipes using fresh corn.  I am sure that would be fantastic, but I like the texture that creamed corn gives.  Besides, scraping corn off the cob is a pain in the tush.
Masa Harina is finely ground corn flour, typically used to make tortillas.  It is readily available at all grocery stores.  I actually cook with it a lot.  It is a great thickener.  And I keep telling myself that one day I will make tortillas…..
I start by beating the masa harina, sugar and butter together.  Just till it is light and fluffy…..about 2 minutes.
Then, I add a cup of creamed corn and mix.
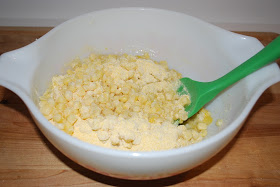
Once the creamed corn is mixed in, I add the remaining ingredients, expect for the water.  I only use water if the mixture is too thick to stir.  This will depend on your humidity.  I live in a very dry area….high desert….which is always so weird to me since it snows here.
I pour the mixture into a baking dish.  I use a pretty Mexican one.  I am nothing if not authentic;)  I sprayed the dish first with cooking spray, just to be safe.
I cover the dish in plastic wrap, and then foil.  This will create steam.  This dish cooks on a low temperature for about one hour.  The steam will help keep it moist.  It should be a bit like a steamed pudding and a bit like a cake;)
I only cook it for half the time with the plastic wrap foil combo.  After about 30 minutes, I uncover it and let it cook another 30 minutes.
When it is done, the edges will pull away and the middle won’t be jiggly.
Ummmm yum.  It is sweet, but not overly sweet.  Now that I know how to make these, I don’t have to go to Chevy’s and steal them off people’s plates.  If I had a Chevy’s margarita I would be all set!
My final recipe is more of an idea then a real recipe.  Have you been to BJ’s and had a Pizookie?  It is basically a cookie that is baked in its own little tin.  They put ice cream on it….and they are fantastic. 
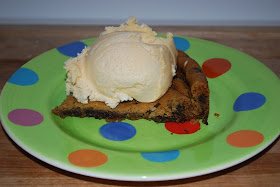
My take on a Pizookie is……I bake one large cookie in a cast iron skillet.  Then, I slice it into wedges and serve it with ice cream on it. 
I use a tube of cookie dough, butter and my cast iron skillet.  This is a perfect dessert to serve if you have last minute guests……if you keep cookie dough on hand.  Of course, you could make your own cookie dough too;)
I pour melted butter into my pan first because I believe butter makes everything better.  But I think you already knew that about me;)
I press the whole tube of dough into the bottom of the pan.  Could not be easier.  I bake it according to the package directions…sort of.  It will take a bit longer then what the package says since it is one big cookie.  Just cook it until it is brown on top!
From here you could cut it into wedges, or take it out and serve it as one big cookie;)
It is like a fancy ice cream sandwich!  Yummers!

I hope you enjoy all of these top secret recipes that I had to steal.  I had to dress like a ninja and break in to many restaurants to get these secrets.  It is lucky that I have cat like reflexes that kept me from getting caught.  I do it all for you;)
Ok, I didn’t do any of that.  It was actually just trial and error in my kitchen.  But I think I came pretty close!  If anyone from Red Lobster, BJ’s, Boston Market or Chevy’s is reading this…..imitation is the sincerest form of flattery, right?
“Cheddar Bay” Biscuits
2 & ¼ cups Bisquick
3 tablespoons butter, melted
2/3 cup heavy cream
1 tablespoon dried minced chives
2 teaspoons garlic powder
1 cup cheddar cheese, shredded
1 teaspoon salt
½ teaspoon pepper
Pre-heat oven to 450 degrees.
In a large bowl, mix together Bisquick, garlic powder, dried chives and salt & pepper.  Add butter, cream and cheese and mix until blended.  If necessary, use your hand to mix.
With a mini ice cream scoop, drop dough onto a greased baking sheet.  Bake at 450 degrees for 8 to 10 minutes.
Creamed Spinach-Boston Market Style
16 ounces frozen spinach, defrosted and squeezed dry
1 clove garlic, minced
2 tablespoons butter
2 tablespoons cream cheese
½ cup heavy cream
3 ounces asiago cheese, grated
Salt and pepper to taste
In a large sauté pan, melt butter.  Add garlic and cook for about 2 minutes, over medium heat.  Add cream cheese and cook for another 2 minutes to melt cream cheese.  Whisk in cream until sauce is smooth.  Whisk in grated cheese.  Salt and pepper sauce to taste.  Stir in spinach and cook until heated through.

“Sweet Corn Tamalitos”-Chevy’s
1 cup creamed corn
1 cup canned corn, drained
¼ cup masa harina
5 tablespoons butter, softened
1/3 cup sugar
½ cup cornmeal
1 teaspoon baking powder
½ teaspoon salt
3 tablespoons heavy cream
Pre-heat oven to 325 degrees.
With a hand mixer, beat together masa harina, butter and sugar until light and fluffy.  Stir in creamed corn.  Then, stir in corn, corn meal, baking powder, salt, and heavy cream.  If mixture is too thick, add about 1 tablespoon of water.
Pour mixture into greased baking dish.  Cover with plastic wrap and foil.  Bake at 325 degrees, covered, for 30 minutes.  Remove plastic wrap and foil, and continue baking for another 30 minutes or until edges pull away and middle is set.